

This guide is a part of another guide Sonoff Smart Switch LAN Control without Internet. In order to control our Sonoff Pow locally, We’ll change the firmware inside. Sonoff Tasmota firmware is a third party opensource firmware popular especially among Sonoff Smart Switches. By installing Tasmota firmware, We’ll not only be able to achieve local control of our WiFi Power Monitoring Switch without internet but also get energy data such as Voltage, Amperage, Wattage etc.
Let’s have a look on the whole process briefly. First We’ll prepare our Sonoff Pow to make it ready for connecting it to our computer. Secondly, We’ll back the original firmware up and upload Sonoff Tasmota firmware using our computer and serial adapter. In last, We’ll configure our new firmware a little bit and our Sonoff Pow will be ready to be installed to it’s final place.
Contents:
- Sonoff Pow Firmware Modification
- – – – Step A – Dissembling
- – – – Step B – Programming Mode
- – – – Step C – Upload Firmware
- – – – Step D – Firmware Configuration
- – – – Step E – Reassembling
- – – – Step F – Calibration
- – – – – – – – – – – – – Method 1
- – – – – – – – – – – – – Method 2 – Alternative Calibration
Sonoff Pow Firmware Modification:
Note: Always unplug the Sonoff device from AC Power Source before start working with it.
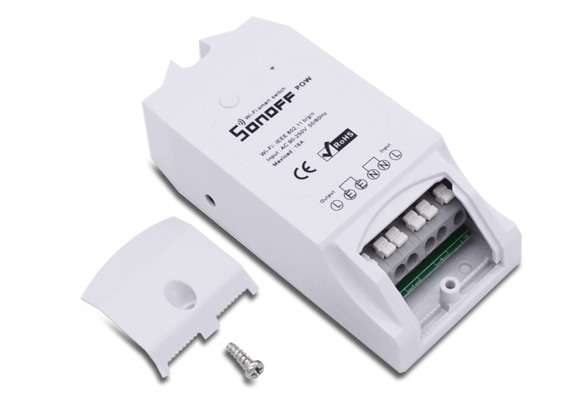
Step A – Dissembling:
Unscrew the screw found on the top of Sonoff Pow using screw driver and lift the small lid. Take the top and bottom case apart. PCB is mount on bottom case with the help of four screws. Remove the screws and take PCB out.
Step B – Programming Mode:
Note: Do not plug Sonoff Device to AC Power Source while connected to PC
Install a male or female header on holes given for programming the device by soldering it permanently for a firm connection. Header without soldering will result in loose connection and uploading may fail.
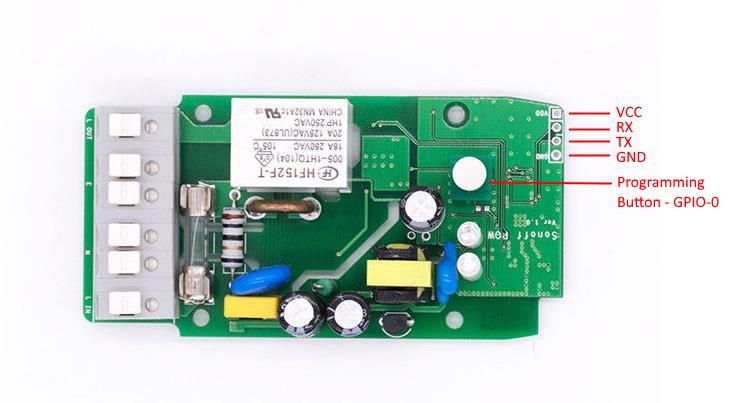
Let’s have a look onto programming header pinout. First pin labeled as VDD, is VCC followed by RX, TX and GND. Connect FTDI according to the following combinations.
| FTDI | Sonoff Pow |
| 3.3V | VCC |
| TX | RX |
| RX | TX |
| GND | GND |
Press the programming button which connects GPIO-0 with GND and Plug the FTDI in to PC. Now micro-controller present in our Sonoff Pow i.e. ESP8266 will start in programming mode.
Step C – Upload Firmware:
Backup official firmware by following our guide Backup & Restore Official Firmware of Sonoff WiFi Smart Switches under Backup / Download Official Firmware section. After backup, download Sonoff-Tasmota Firmware and upload it according to Upload Official / Third Party Firmware.
Step D – Firmware Configuration:
By short pressing on board programming button four times, Sonoff Tasmota Firmware allows booting up Sonoff Smart Switches into Wifi Manager Mode providing an Access Point with IP address 192.168.4.1 to configure WiFi credentials. Short press the programming button four times quickly and repeatedly and Sonoff Pow will boot into Wifi Manager Mode.
Now a new Access Point will pop up under available WiFi networks with the name of sonoff-XXXX (Where XXXX is any number). Connect to this new sonoff-XXXX network and configuration page will open in your browser. If it does not open into your browser automatically, open to http://192.168.4.1 into your favourite browser.
Connect Sonoff Pow to your WiFi network according to Configure WiFi Network Settings under Sonoff Tasmota Firmware and configure MQTT parameters by following the instructions given under Configure MQTT Settings under Sonoff Tasmota Firmware. Now Sonoff Pow can be accessed by visiting the IP address assigned to it by your WiFi router. Consult your router documentation on how to find the IP address of connected devices. You can also assign a static IP address to your Sonoff device by following instruction given under Set Static IP Address under Sonoff Tasmota Firmware section. By default web page access to Sonoff Tasmota Firmware is open and anyone connected to WiFi network can access to it. Let’s secure web access page by setting up Web Admin Password according to Configure Web Admin Password under Sonoff Tasmota Firmware. Change the module type to Sonoff Pow according to Configure Module Type under Sonoff Tasmota Firmware otherwise Sonoff Pow may not work as expected.
Now You have completed almost all necessary configuration of Sonoff Tasmota. You can also set default Power on State which will be followed on Sonoff device restart, among ON, OFF and KEEP according to Configure Power On State After Boot Up. Correct Timezone and NTP Server configurations are necessary for timer related functions. However, It is recommended to configure NTP Server and Timezone according to instructions given in Configure NTP Server and Timezone.
Step E – Reassembling:
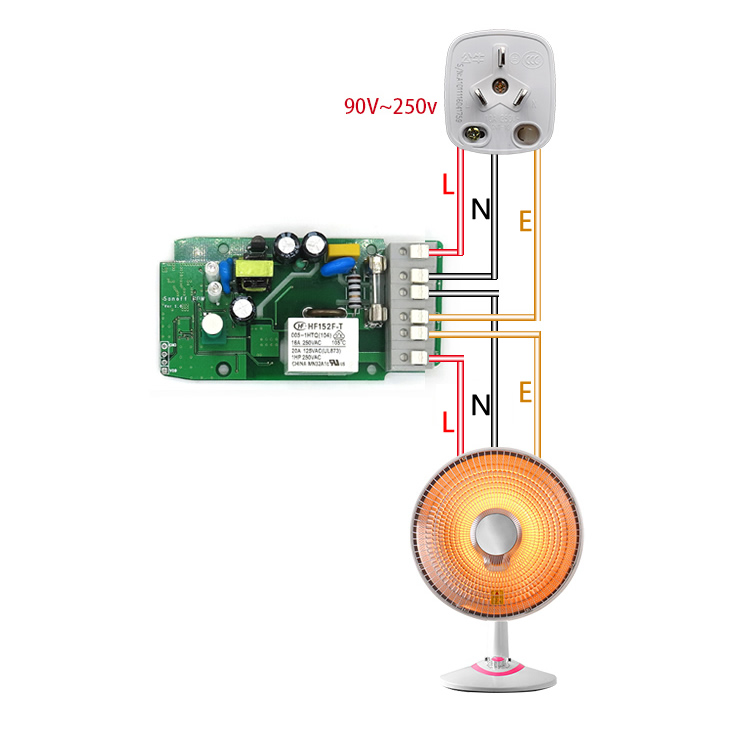
Now our Sonoff Pow is ready for the work. Reassemble Sonoff Pow by fixing the PCB on bottom side, tighten the screws back and join top and bottom lids together. Connect the wires according to diagram below and Sonoff Pow is live!!.
You can toggle the light ON & OFF by visiting the IP address assigned to Sonoff Pow by router. But the smarter way to toggle a switch is discussed in our guide Sonoff Smart Switch Tasmota Local Control. Navigate to Step E – Connect & Control the devices to proceed further if you are already following the steps in guide Sonoff Smart Switch Tasmota Local Control.
Step F – Calibration:
Method 1:
It is recommended to calibrate Sonoff Pow to achieve correct measurements, influenced by hardware and timing differences. You will require a calibrated multimeter and 60W light bulb with Holder for the calibration. Connect the Bulb to output line of Sonoff Pow and open web page showing main Sonoff Pow interface in two separate parallel web browser tabs. Wait a few seconds to stabilized the readings.
Note:
If you do not own a multimeter, adopt the Alternative Calibration Method in the end of guide.
Power Calibration:
Click on Console on one browser tab and watch out Power data on other page. Check out the Power in Watts on multimeter and compare it with reading on Sonoff Pow web page. If there is a difference observed then change offset value by issuing the following command over the Console.
PowerCal 10000
- Where 10000 is the desired offset value
Default offset value is 12530. Input value starting from 10000 in console and hit enter key. Increase the value using the same command until values on multimeter and Sonoff Pow web page resembles each other.
Current Calibration:
Click on Console on one browser tab and watch out Power data on other page. Check out the Current in Amperes on multimeter and compare it with reading on Sonoff Pow web page. If there is a difference observed then change offset value by issuing the following command over the Console.
CurrentCal 2500
- Where 2500 is the desired offset value
Default offset value is 3500. Input value starting from 2500 in console and hit enter key. Increase the value using the same command until values on multimeter and Sonoff Pow web page resembles each other.
Voltage Calibration:
Click on Console on one browser tab and watch out Power data on other page. Check out the Voltage on multimeter and compare it with reading on Sonoff Pow web page. If there is a difference observed then change offset value by issuing the following command over the Console.
VoltageCal 1000
- Where 1000 is the desired offset value
Default offset value is 1950. Input value starting from 1000 in console and hit enter key. Increase the value using the same command until values on multimeter and Sonoff Pow web page resembles each other.
Method 2 – Alternative Calibration:
Sonoff Pow can also be calibrated without multimeter, if we have a known load connected e.g 60W bulb on a 240V supply with 250mA Current. Issue the commands below to auto calibrate Power, Current and Voltage respectively.
PowerSet 60
VoltageSet 240
CurrentSet 250