

Contents:
- WiFi Network
- Using Backlog to issue multiple commands at once
- Static IP Address
- MQTT Credentials
- Web Admin Password
- Module type
- Sonoff Pow Power Monitoring (Switched OFF)
- Power on State after Bootup
- NTP Server and Timezone
- Reset Tasmota to Default Settings
- Stop Reset in case of MQTT / WiFi Failure
- Stop Reset in case of Power Cycle
Sonoff Tasmota is the most popular third-party firmware for controlling ESP8266 / ESP8285 based smart device especially Sonoff Smart Switches.
Configure WiFi Network Settings under Sonoff Tasmota Firmware:
Navigate to Configuration > Configure WiFi and input your WiFi network SSID and Password as shown below.
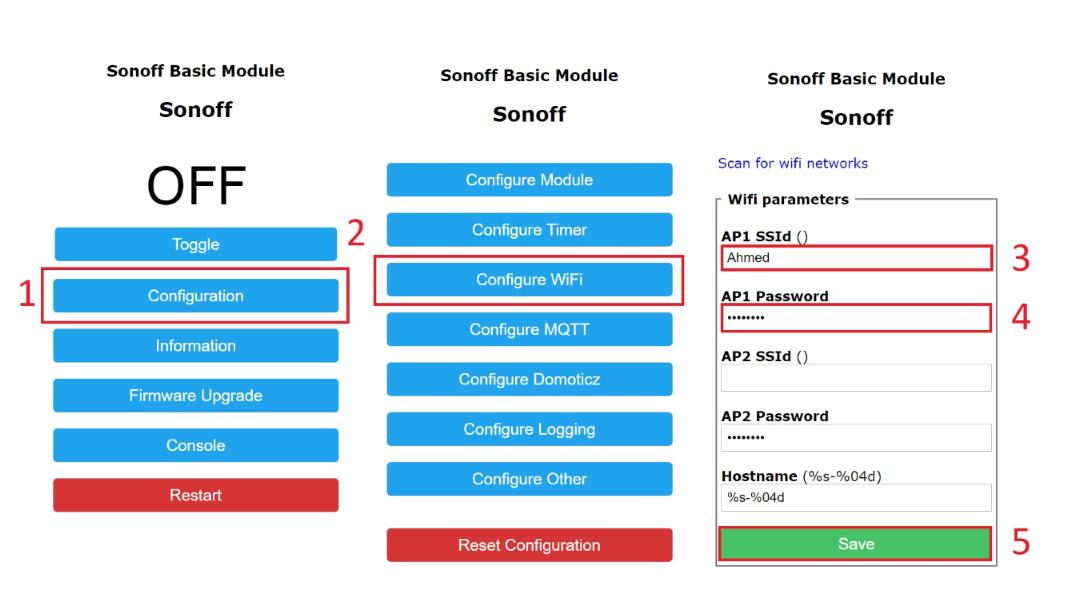
Hit Save after entering credentials of one or more networks. Now Sonoff Slampher will reboot and connects to your own WiFi network. Find the newly connected device under your Router Settings and navigate to the IP address e.g. http://192.168.50.145.
Using Backlog to issue multiple commands at once:
We can issue multiple commands using Backlog in Tasmota. For example, we can set the MQTT Host / Server, User name and Password in one single command. A semi colon (;) is used to separate each sub command.
Backlog MqttHost <host>; MqttUser <username>; MqttPassword <password>
- Change MQTT host name / server address by replacing <host>.
- Change MQTT user name by replacing <username>.
- Change MQTT password by replacing <password>.
Set Static IP Address under Sonoff Tasmota Firmware:
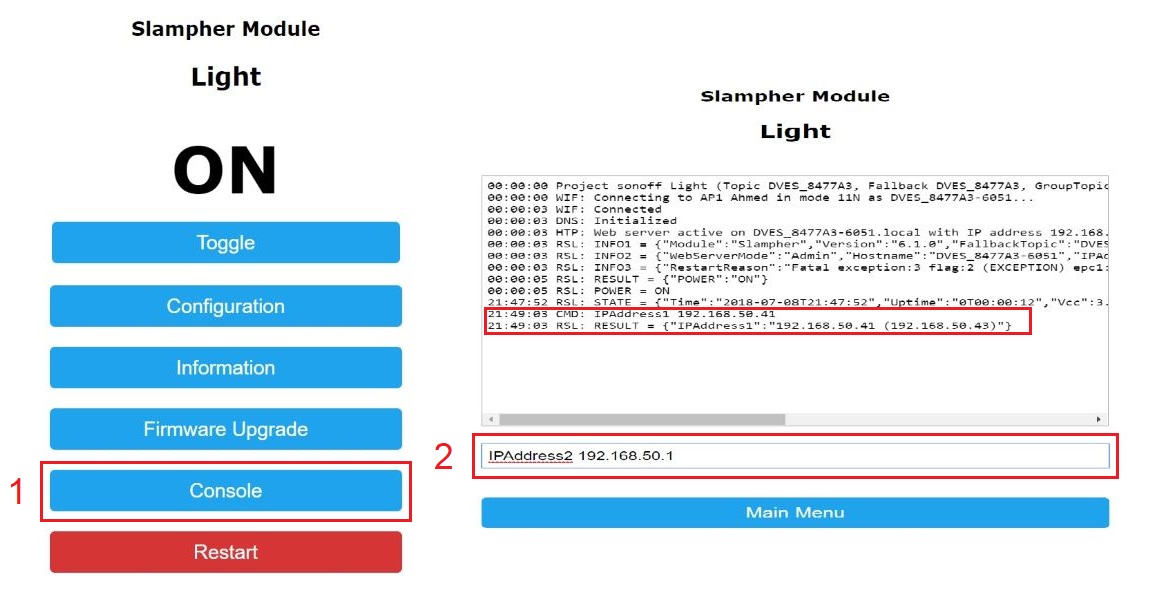
Static IP address is important for various reason such as Yeti will use that address to connect a Sonoff device and toggle it’s relays. Change in IP address by your router will result in failure to control a Sonoff device using Yeti. There is no graphical user interface to change these settings. However, We can use Tasmota Console to issue commands to change these settings. Navigate to Console, enter commands one by one in given box and press Enter key each time. Various commands are discussed below;
1) IP Address:
IPAddress1 192.168.50.41
- First three pair should match your router configuration.
- Change fourth pair as desired.
2) Gateway:
IPAddress2 192.168.50.1
- Gateway is the IP address of your router.
3) Subnet Mask:
IPAddress3 255.255.255.0
4) DNS Server:
IPAddress4 192.168.50.1
- DNS Server is the IP address of your router.
5) Reboot:
restart 1
- Reboot Sonoff after setting up IP address, Gateway, Subnet Mask and DNS Server
Update all of these settings at once using Backlog command:
Backlog IPAddress1 192.168.50.41; IPAddress2 255.255.255.0; IPAddress3 192.168.50.41; IPAddress4 192.168.50.1; restart 1
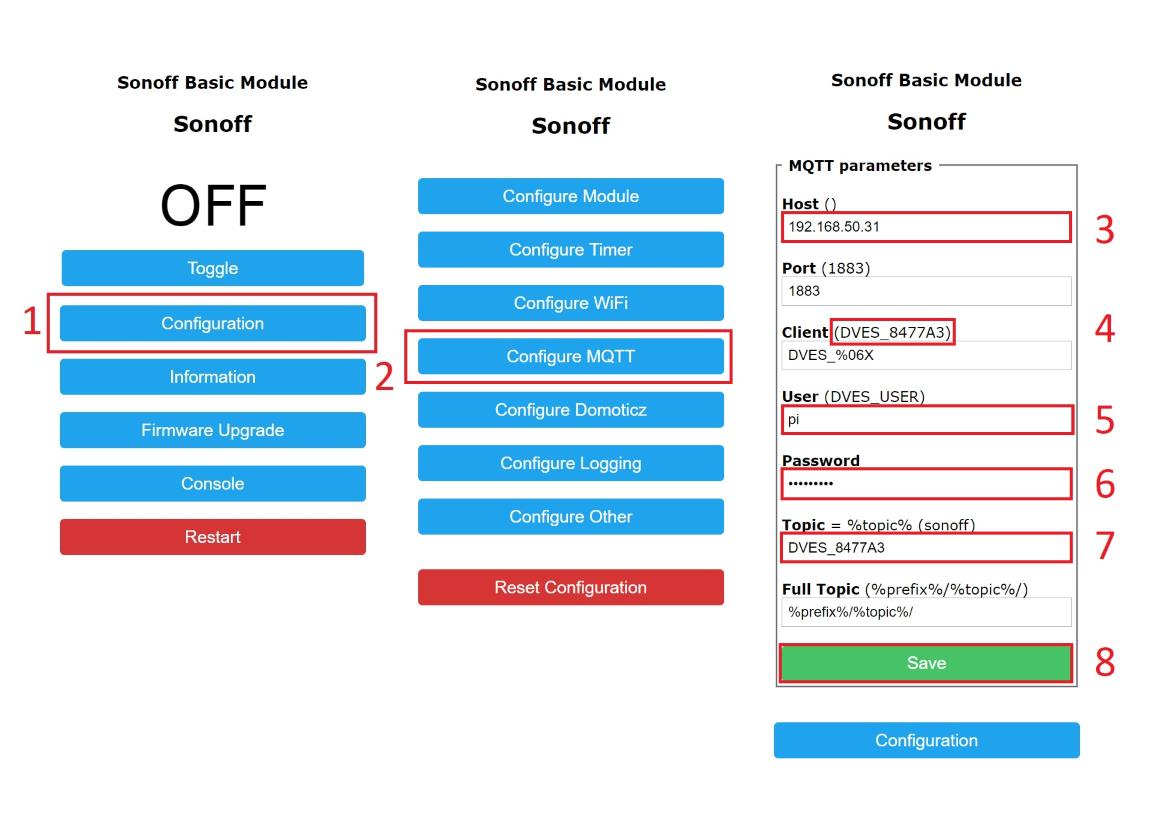
Configure MQTT Settings under Sonoff Tasmota Firmware:
Navigate to Configuration > Configure MQTT and input MQTT broker details where Host is IP address of computer running MQTT broker, User and Password are the user name and password required to connect to MQTT Broker. Change the port only if you have changed the port of your MQTT broker. Change Topic to either esp-specific client by copying it and pasting it under Topic field or any name of your choice. Hit Save once you are done with it.
Remember all MQTT clients / devices should have unique Topic for proper communication.
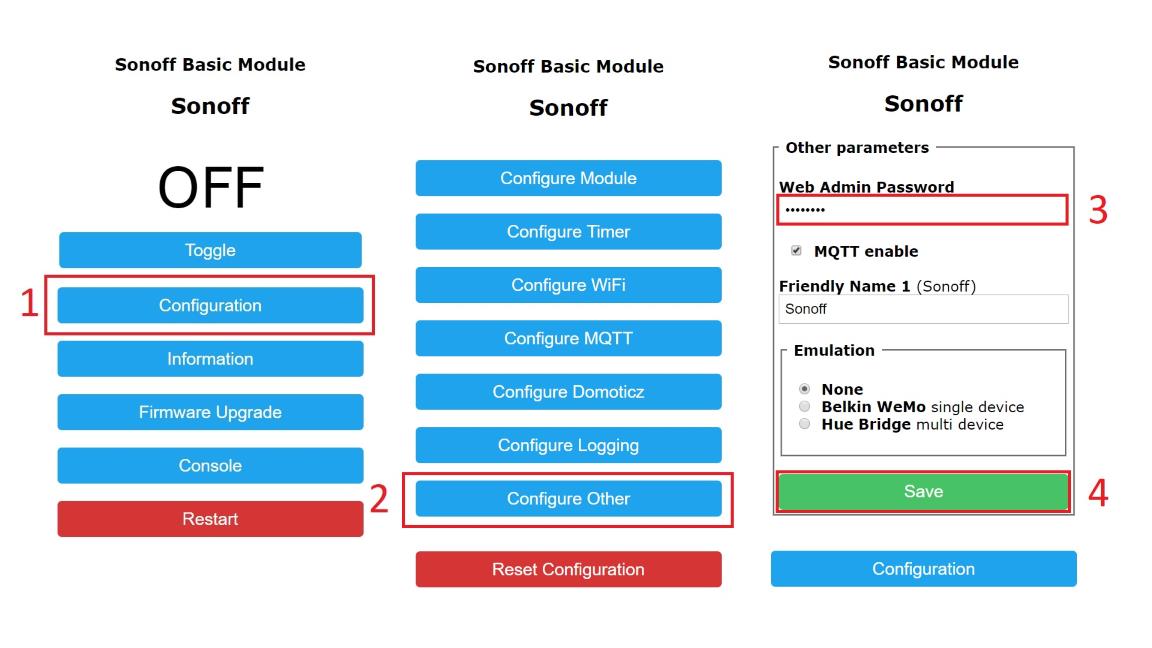
Configure Web Admin Password under Sonoff Tasmota Firmware:
Navigate to Configuration > Configure Other and input Web Admin Password in respective field. You can also change Friendly Name if required. Hit Save to take changes effect. Now browser will ask for user name and password. Admin is default user name and input the password you entered in Web Admin Password field before. Sonoff device will restart in few seconds to apply the configuration.
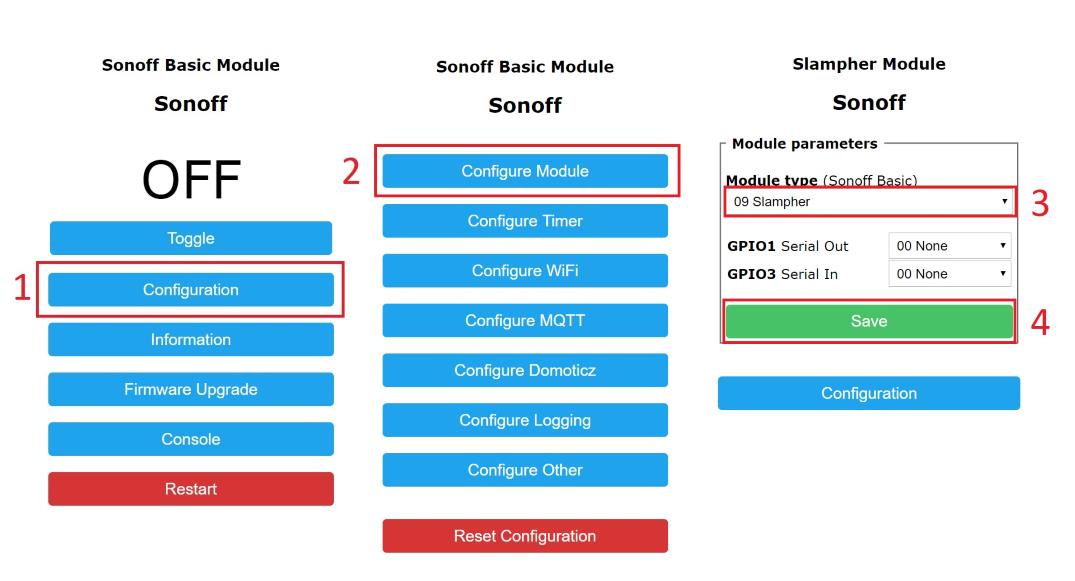
Configure Module Type under Sonoff Tasmota Firmware:
Sonoff Smart Switch will not work as expected until correct module type is not selected. Navigate to Configuration > Configure Module and choose your desired Sonoff Switch e.g. Slampher under Module type. Hit Save and device will restart in few seconds to apply the configuration.
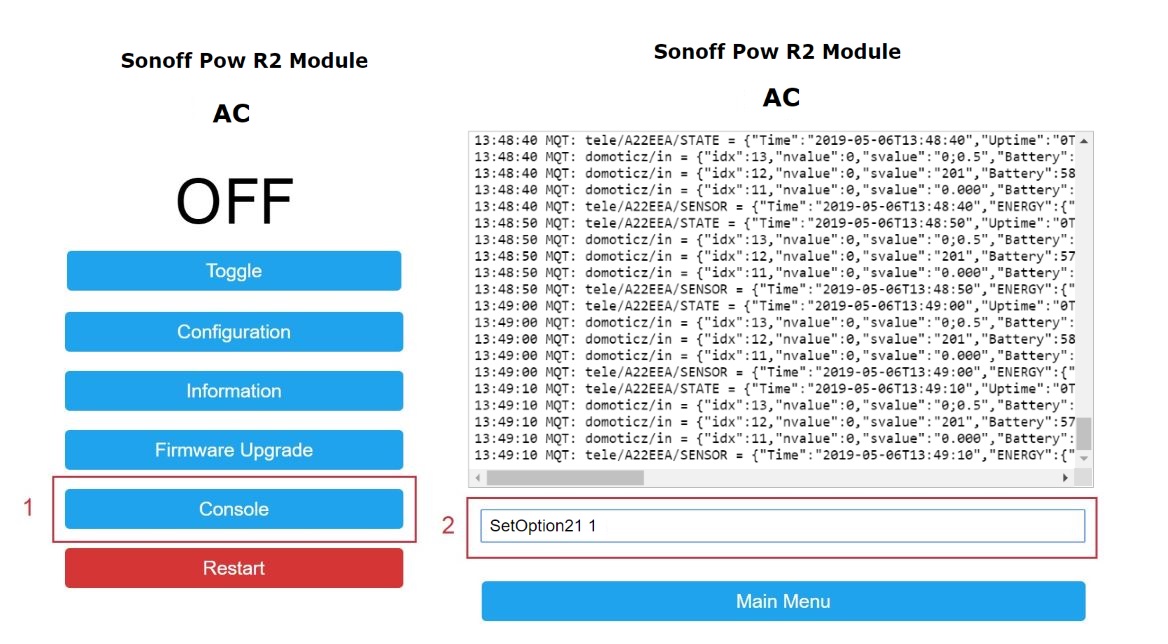
Sonoff Pow Power Monitoring:
By default Sonoff Pow (R2) does not present energy data when switch is under OFF state. To send the energy data (Current, Voltage, Power etc.) even under switched OFF state, enable SetOption21 under Console by issuing the following command.
SetOption21 1
Configure Power On State After Boot Up:
You can set Power on state to ON, OFF, KEEP for any Sonoff device using Tasmota firmware. ON state will always keep the switch ON after boot up and OFF state will always keep the switch OFF after boot up, no matter what would be the state prior re boot. KEEP state will remember the switch state and keep that state after boot up. By default KEEP state is active which remember the state of switch and maintain it after reboot.
There is no graphical user interface to change these settings. However, We can use Tasmota Console to issue commands to change these settings. Navigate to Console, enter command in given box and press Enter key. Various commands are discussed below;
Check Current State:
- Issue the command given below and press enter key.
PowerOnState
- Output will be as follows.
- Number shows the current Power on State i.e. 3 in example below.
11:01:25 RSL: RESULT = {"PowerOnState":3}
Set Power ON State to OFF:
- Issue the command given below and press enter key.
PowerOnState 0
- Now switch will be turned OFF on boot up.
Set Power ON State to ON:
- Issue the command given below and press enter key.
PowerOnState 1
- Now switch will be turned ON on boot up.
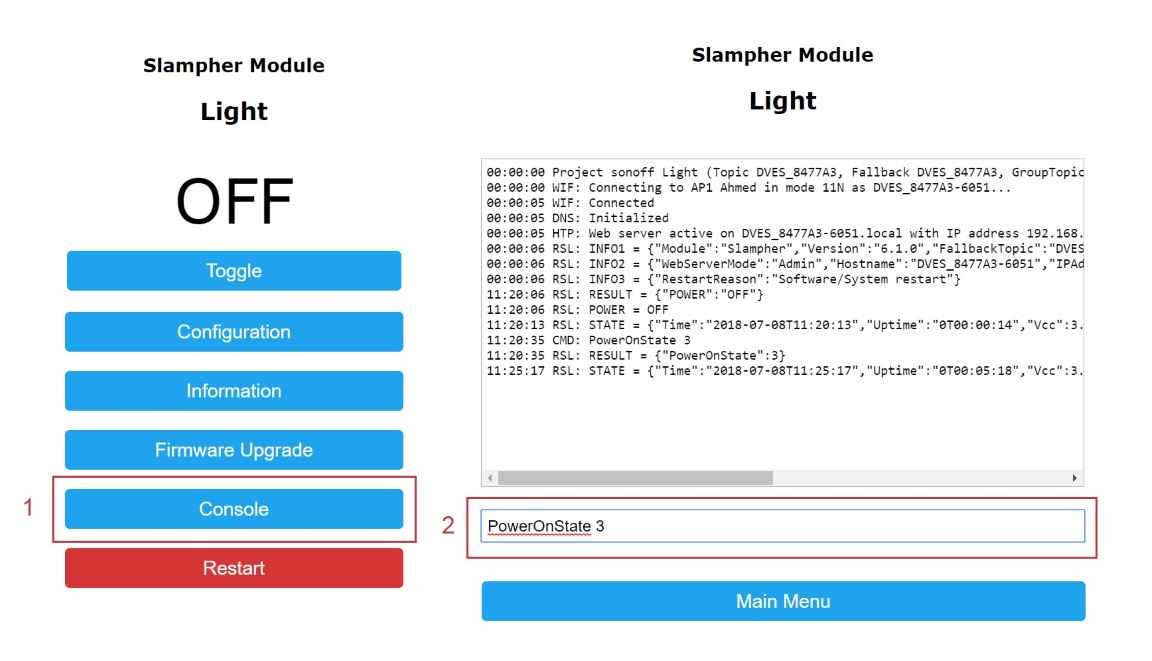
Set Power ON State to KEEP:
- Issue the command given below and press enter key.
PowerOnState 3
- Now switch will be turned OFF on boot up.
Other Available Modes:
- Toggle switch(es) on from last saved state
PowerOnState 2
- Turn switch(es) on and disable further switch control
PowerOnState 4
- After a pulsetime period, Turn switch(es) on and disable further switch control
PowerOnState 5
Configure NTP Server and Timezone:
Correct time is necessary for various tasks to perform on it’s specified time such as Tasmota Timers. For this purpose, correct NTP Server address and setting up correct timezone are mandatory steps. If you have local NTP server running such as Raspberry Pi Server equipped with RTC Module then point NTP Server to IP address of Raspberry Pi. If you have an internet access then change it to valid pool zone such as asia.pool.ntp.org. There is again no graphical user interface for these settings and We’ll use Tasmota Console in the same way We used for Configure Power On State After Boot Up earlier.
Change NTP Server:
Navigate to Console, issue the commands below one by one and press enter after typing each command.
ntpServer1 0.asia.pool.ntp.org
ntpServer2 192.168.50.30
ntpServer3 0.pool.ntp.org
- Sonoff will reboot after issuing each command, so wait until system boots up successfully.
- ntpServer1 represent NTP Server 1 which is set to ntp.org NTP Server.
- ntpServer2 is pointed to local Raspberry Pi NTP Server.
- ntpServer3 also set to ntp.org NTP Server.
- You can set all of three NTP Servers addresses to one NTP Server.
Change Timezone:
Navigate to Console, issue the command below and press enter.
timezone 5
- Where 5 means UTC +5 represents to Pakistan.
- You should change the digit according to your local time zone.
- For example, for UTC -5 use timezone -5.
Update NTP Server and Timezone at once using Backlog command:
Backlog ntpServer1 0.asia.pool.ntp.org; ntpServer2 192.168.50.30; ntpServer3 0.pool.ntp.org; timezone 5; restart 1
Reset Tasmota to Default Settings:
You can reset tasmota to default settings using web graphical user interface and hardware button.
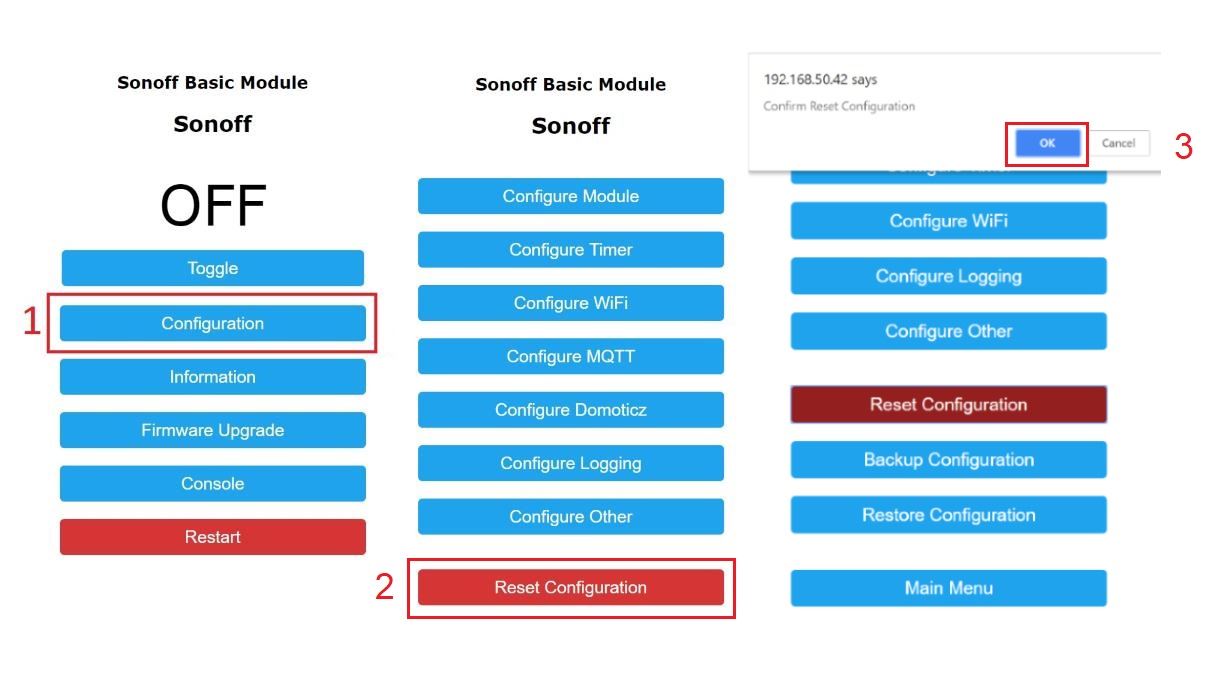
Reset via GUI:
Navigate to Configuration > Reset Configuration. Confirm the the reset configuration dialogue and system will reset to default settings.
Reset via Hardware Button:
If you have access to Sonoff device, press the button for forty seconds and system will reset itself to default configuration.
Stop Reset in case of MQTT / WiFi Failure:
Tasmota is equipped with a feature that identifies boot loops and safeguards the device by resetting it to factory default settings. However, this can be problematic when there is a failure in the WiFi or MQTT network. Until the connection is restored, the device may experience numerous boot loops, leading to repeated resets and disconnections from the main controller. To mitigate this issue, navigate to Home > Console and enter the follow commands:
- Turn off the boot loop default restoration control by entering the command
SetOption36 0.
Stop Reset in case of Fast Power Cycle:
Tasmota is equipped with a feature that resets all Tasmota settings after seven power cycles which is enabled by default. However, this can be problematic when there is an issue with power source with device experiencing numerous boot loops, leading to resets to the default settings. To mitigate this issue, navigate to Home > Console and enter the follow commands:
- Disable device recovery through rapid power cycle detection by using the command
SetOption65 1.
Its a suggestion that please make a video for customers that how to configure device. The details you have shared is very confusing .
Thanks for the perfect, ABSOLUTLY NOT CONFUSING details, that are hard to find in the video-infested internet 😉
O código fonte Tasmota funciona em qualquer modelo de dispositivo sonoff ou tem um código para cada modelo????
Pre-build binaries such as Sonoff.bin works with all Sonoff devices. Just choose a correct device under configuration after installing it.
hat does ‘default configuration’ mean. Will it lose local ip address and only be an access point again? Will it default to Generic, or Sonoff basic?