
Usually hosting an application from our computers reside at our premises requires forwarding the respective port to allow the inbound traffic towards our application servers. Which may requires a static IP or little bit other heavy lifting to accomplish the task.
Suppose we are hosting an application using a static IP from an ISP A. We also have a backup connectivity from ISP B using another static IP address. If there is a disconnection occur, we have to switch IP addresses under DNS manually or automatically. Which may cause unnecessary complications and delays. Another scenario is, where static IP is either too costly or ISP has blocked certain ports or sometimes all inbound traffic which makes it impossible to host an application right from our home.
One may ask, why should we not host our application at cloud or VPS? This solution is fine for an application requires small resources. But if an application requires 4 Gigabit of RAM and more than a single core CPU? then a VPS will cost handsome amount for a given period of time and hosting from home will be a good option. Here it comes HAProxy which is an efficient tool used for load balancing and proxying TCP and HTTP-based applications.
How the stuff works?
- In this approach, we shall use a VPS with least resources i.e. Single Core / 1GB RAM / 10GB SSD or Reverse Proxy Forwarding offered by us at very economical cost of USD 1 / Month / Port (Annual Plan).
- A domain is forwarded to the IP address of VPS / Reverse Proxy Forwarding.
- VPS / Reverse Proxy Forwarding System is installed with HAProxy.
- NGINX is installed and used to proxy a port easily to avoid any complications in HAProxy setup.
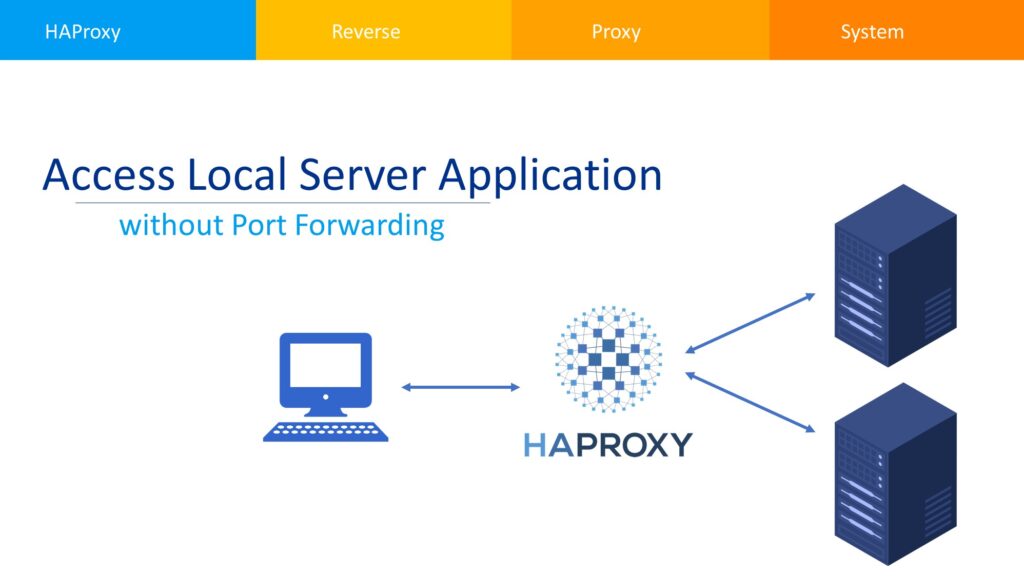
- Local application server will be connected to HAProxy using SSH Tunnel.
- Traffic will be forwarded from HAProxy to Local Server in the same way as a port forwarded on a router installed at our premises.
Proxy Server Configuration:
- Install HAProxy by using the command
sudo apt-get install haproxy. - Install Nginx using the command
sudo apt install nginx. - Configure Nginx to proxy a domain on certain port
sudo nano /etc/nginx/sites-available/subdomain.
server {
        listen 80;
        listen [::]:80;

        server_name subdomain.hobbytronics.pk www.subdomain.hobbytronics.pk;

        location / {
                rewrite ^ https://$host$request_uri? permanent;
        }
}

server {
        listen 443 ssl http2;
        listen [::]:443 ssl http2;
        server_name subdomain.hobbytronics.pk www.subdomain.hobbytronics.pk;

        location / {
                        proxy_pass http://XXX.XX.XX.XX:8080;
                        proxy_http_version 1.1;
                        proxy_set_header Upgrade $http_upgrade;
                        proxy_set_header Connection "upgrade";
                }

        ssl_certificate /path_to/ssl/subdomain.hobbytronics.pk.fullchain.pem;
        ssl_certificate_key path_to/ssl/subdomain.hobbytronics.pk.privkey.pem;

        add_header X-Frame-Options "SAMEORIGIN" always;
        add_header X-XSS-Protection "1; mode=block" always;
        add_header X-Content-Type-Options "nosniff" always;
        add_header Referrer-Policy "no-referrer-when-downgrade" always;
        add_header Content-Security-Policy "default-src * data: 'unsafe-eval' 'unsafe-inline'" always;
        # add_header Strict-Transport-Security "max-age=31536000; includeSubDomains; preload" always;
        # enable strict transport security only if you understand the implications

}
- Configure HAProxy to open ports
sudo nano /etc/haproxy/haproxy.cfg.
frontend web-frontend
        bind *:8080
        mode http
        default_backend web-backend-80


backend web-backend
        server sshtunnel-0 127.0.0.1:8081 check
- There should be a blank line at the end otherwise it will produce an error.
- Use
sudo haproxy -c -f /etc/haproxy/haproxy.cfgto validate the changes, and there should beConfiguration file is validin the end. - Restart HAProxy
sudo service haproxy restartto take the changes effect.
Local Server Configuration:
- Open the terminal and access the Remote Proxy Server using ssh e.g.
ssh [email protected]. - Accept the security alert by typing YES followed by Enter.
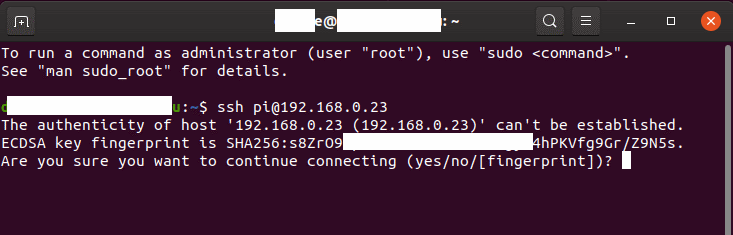
- Enter the Remote Proxy Server password to connect to it.
- Connecting to Remote Proxy Server at least once is mandatory to save the server key in safe list, so that our ssh tunnel can connect to it without any issue.
- Install AutoSSH
sudo apt-get install autosshto connect to proxy server. - Create keys for SSH according to the Login Raspberry Pi via SSH Key – SSH Key Authentication.
- Copy private key file e.g.
open_ssh_key.ppkto local server at some location e.g./home/user/. - Adjust file permissions to either read only or writable;
- Read only
chmod 400 /path_to/private_key_file. - Read & Write
chmod 600 /path_to/private_key_file.
- Read only
- Add service to systemd to start AutoSSH during boot or restart in case of any failure
sudo nano /etc/systemd/system/tunnel.service.
[Unit]
Description=Autossh
Wants=network-online.target
After=network-online.target
StartLimitIntervalSec=0

[Service]
ExecStart=/usr/bin/autossh -M 0 -N \
    -o "ServerAliveInterval 15" -o "ServerAliveCountMax 3" -o "ConnectTimeout 10" -o "ExitOnForwardFailure yes" \
    -i /home/user/open_ssh_key.ppk -p 22 [email protected] \
    -R *:8081:localhost:8081 \
    -R *:8082:192.168.1.100:8082
Restart=always
RestartSec=10

[Install]
WantedBy=multi-user.target
- Replace [email protected] with actual parameters e.g.
[email protected]. - Above example is forwarding two ports 8081 and 8082 on to the local machine. You may add more lines
-R *:8081:localhost:8081 \to add more ports. Do not forget to add\in end otherwise it will not added to the command. - Tell systemd for change / addition in services
sudo systemctl daemon-reload. - Enable the service for auto-start at boot
sudo systemctl enable tunnel.service. - Start the tunnel service
sudo systemctl start tunnel.service. - Get the tunnel service status
sudo systemctl status tunnel.service -l.
Troubleshooting:
- If tunnel service status produces error as ssh permissions are too open, then set the private key file permission as stated above e.g.
chmod 600 /path_to/private_key_file. - if faced ssh returning invalid format, then there is an issue with the format of private key file.
- Open PuTTY Key Generator
- Load private_key_file.ppk
- Go to Conversions > Export OpenSSH key
- Save the file e.g. new_private_key_file.ppk and use it for ssh session
- If haproxy is complaining about invalid configuration, make sure that there is blank line at the end of haproxy.cfg.
Job for haproxy.service failed.
See "systemctl status haproxy.service" and "journalctl -xeu haproxy.service" for details.
- Always check the haproxy.cfg by
sudo haproxy -c -f /etc/haproxy/haproxy.cfgbefore restarting the haproxy service.