Every system generates sufficient amount of logs of operations taking place. Saving these logs for a certain duration may help the system administrator to investigate the issues, a system may face. For this purpose syslog servers are used which manage these log in order to make the troubleshooting easy.
Internet of things is progressing day by day as its use is increasing in our daily life ranging from a simple switching of an electrical appliance to very sophisticated operation involving artificial intelligence. Each and every component of IOT system generates logs. In this tutorial, we’ll focus on a simple but efficient Raspberry Pi based rsyslog server comes built-in with Raspberry Pi OS.
Note:
This tutorial assumes a fully functional Raspberry Pi installed with Raspberry Pi OS. For more Raspberry Pi related articles, visit our Raspberry Pi section.
Installing the rsyslog server:
Rsyslog package comes pre-installed with standard version of Raspberry Pi OS, however, one may install it using the commands below.
sudo apt update
sudo apt full-upgrade
sudo apt install rsyslog
Configure the Rsyslog Server:
Rsyslog does not listen to outside message by default, hence, we have to enable it first to act as a server to preserver our logs from out IOT devices.
- Edit the Rsyslog configuration file by opening the it using nano editor.
sudo nano /etc/rsyslog.conf
- Uncomment the lines responsible for loading the module by removing # hashtag.
module(load="imudp")
input(type="imudp" port="514")

module(load="imtcp")
input(type="imtcp" port="514")
- One may change the syslog port 514 as desired by changing the value in lines uncommented in previous step.
- By default Rsyslog have rules in its configuration file to collect catch-all logs which should be commented out to avoid duplication of logs under numerous file names.
#*.*;auth,authpriv.none		-/var/log/syslog
#cron.*				/var/log/cron.log
#user.*				-/var/log/user.log

# Some "catch-all" log files.
#
#*.=debug;\
#	auth,authpriv.none;\
#	news.none;mail.none	-/var/log/debug
#*.=info;*.=notice;*.=warn;\
#	auth,authpriv.none;\
#	cron,daemon.none;\
#	mail,news.none		-/var/log/messages
- Save the configuration file by pressing CTL and X followed by Y and Enter keys.
Creating a template to save logs for a specific host:
- Create a new file e.g.
anyhostname.confin/etc/rsyslog.ddirectory using nano editor.
sudo nano /etc/rsyslog.d/anyhostname.conf
- Add a rule to this file as given below.
if ($fromhost-ip == "192.168.1.1" ) then /var/log/iotdevices/anyhostname/anyhostname.log
- One may change the ip address
192.168.1.1and log path/var/log/iotdevices/anyhostname/anyhostname.logas desired. - Create the
iotdevicesandanyhostnamefolder in/varfolder as mentioned in rule. For example;
mkdir iotdevices
cd iotdevices
mkdir anyhostname
- Save the configuration file by pressing CTL and X followed by Y and Enter keys.
Log Rotation:
By default, log file will be written for an undefined time, resulting in a huge file if your iot devices generate huge amount of log. Thankfully, Rsyslog package comes with logrotate which solve this problem.
- Navigate to
cd /etc/logrotate.dand editrsyslogfile already exits in this folder.
sudo nano rsyslog
or
sudo nano /etc/logrotate.d/rsyslog
- Add these lines in the end of rsyslog configuration file.
/var/log/iotdevices/anyhostname/anyhostname.log
{
    rotate 7
    daily
    missingok
    notifempty
    compress
    delaycompress
    sharedscripts
    postrotate
        /usr/lib/rsyslog/rsyslog-rotate
    endscript
}
- This script compress the log file
dailyand keeps only 7 filesrotate 7deleting the old ones. More information about these tags can be accessed by visiting logrotate manual page. - Save the configuration file by pressing CTL and X followed by Y and Enter keys.
Restart the Rsyslog:
- After completing all the necessary configuration of Rsyslog, restart the Rsyslog server by the command given below.
sudo systemctl restart rsyslog
Usage Examples:
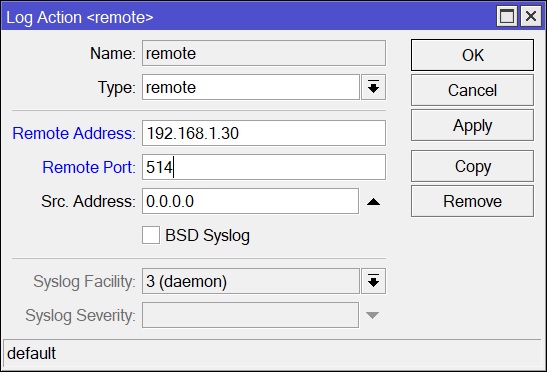
Save Mikrotik Firewall Logs to Rsyslog Server:
- Access Mikrotik using Winbox.
- Navigate to System > Logging > Actions.
- Click on remote action and update;
- Remote Address to the ip address of Raspberry Pi e.g.
192.168.1.30. - Remote Port to the Port
514as defined in very early steps of configuration of the tutorial.
- Remote Address to the ip address of Raspberry Pi e.g.
- Click Apply and OK.