
Error: Contact form not found.
Using low cost 1602 (16 chars and 2 line display) LCD in your IOT projects may cause a lot of trouble if you are trying it for the first time. The main issue is wrong I2C address which is documented in various examples over the internet. I2C address may vary depending upon driver used in a particular I2C module. Here is, How we can make this little low cost LCD display work for us.
Hardware:
- ESP8266 ESP-12E | ESP-12F | NodeMCU Lolin | NodeMCU Amica | WeMos development Boards (D1 | D1 Mini)
- 1602 (16X2) I2C Blue LCD Display
- Bi-directional I2C Logic Level Converter
Software:
- Arduino IDE (ESP8266 Core installed)
- ESP8266-I2C-LCD1602 Library
Finding I2C Address:
- Install ESP8266 core for Arduino IDE if you have not installed already (Follow our other blog post).
- Download and install ESP8266-I2C-LCD1602 Library
- Under example, open ESP8266-I2C-LCD1602 > I2C_Scanner sketch
- Upload I2C_Scanner sketch to ESP8266
- Connect LCD display to any of ESP8266 SMD or Development board using Bi-directional I2C Logic Level Converter as follows;
| I2C Display | ESP8266 | Logic Converter |
| GND | GND | AGND, BGND |
| +5V | +5V | AVCC |
| +3.3V | BVCC | |
| SDA | ASDA | |
| ESP8266 = GPIO 0
NodeMCU | Wemos etc. = D3 |
BSDA | |
| SCL | ASCL | |
| ESP8266 = GPIO 2
NodeMCU | Wemos etc. = D4 |
BSCL |
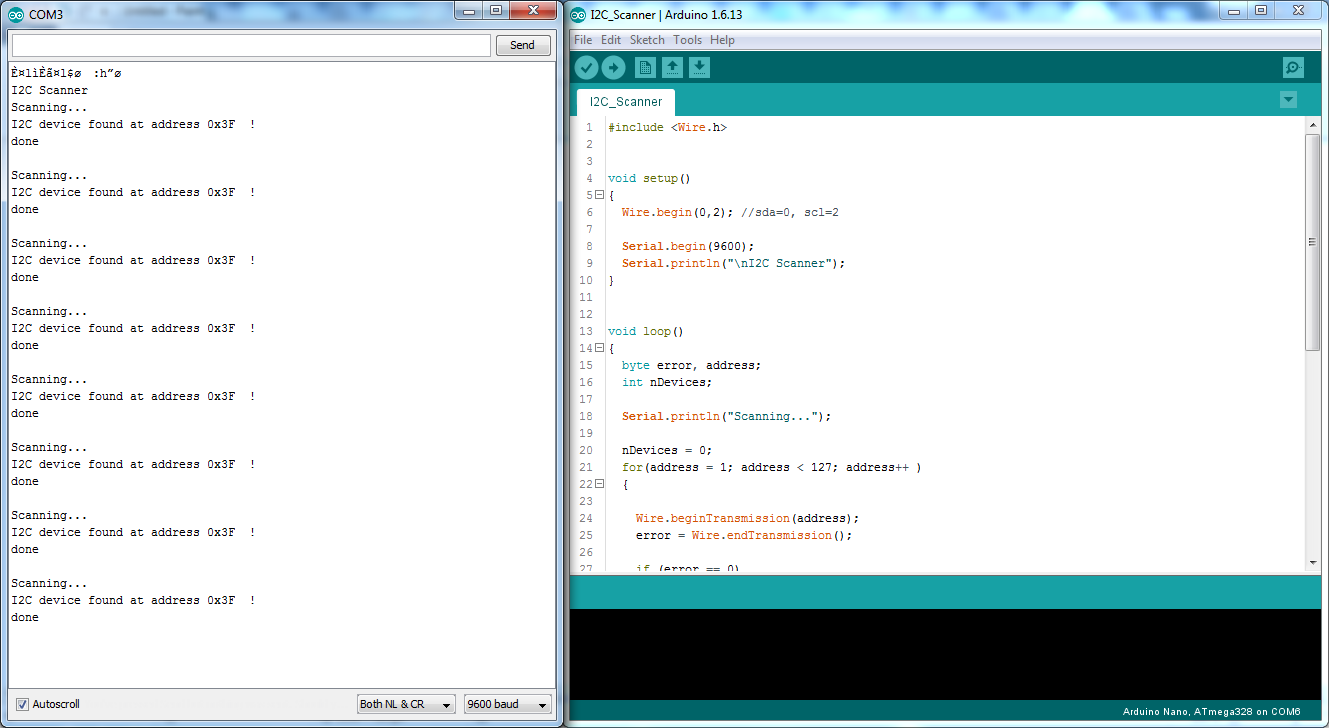
- Open Serial monitor and Press reset button, Note down I2C address (0x3F is I2C address in example shown below), which will be used later
HelloWorld Example:
- Under example, Open ESP8266-I2C-LCD1602 > HelloWorld sketch
- Go to line 13, and change “0x3F” with your own I2C address
LiquidCrystal_I2C lcd(0x3F, 16, 2);
- Upload sketch to ESP8266 and You are done!!
Note:
- GPIO16 (D0) is not capable of I2C. Never use GPIO16 (D0) for connecting to any of I2c device (Visit Startup Guide for ESP8266 NodeMCU WeMos for more information).
- 1602 LCD is 5V logic device while ESP8266 is 3.3V logic device. Never connect 1602 LCD directly to any of ESP8266 SMD or Development Board.
Nice Job!