
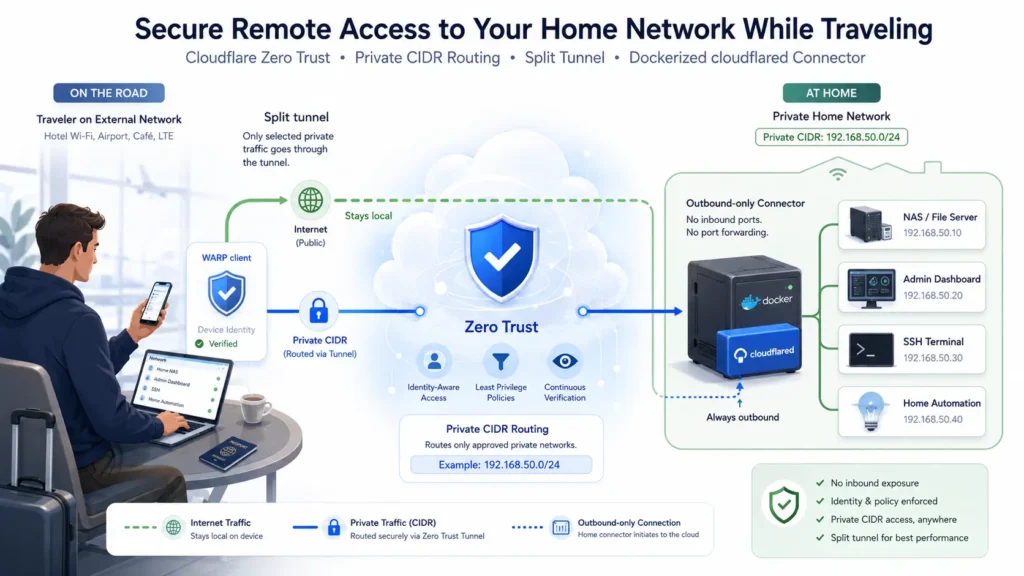
When we want secure access to services on a home network or private remote network while traveling, we do not always need a traditional full-tunnel VPN that sends everything through one gateway.
A cleaner option is to use Cloudflare Zero Trust with:
- Private CIDR routing for internal subnets
- Split tunnels so only the traffic we choose goes through Cloudflare
- A Dockerized
cloudflaredconnector running inside our network
This gives us controlled remote access to private resources without exposing those resources directly to the public internet.
In this post, I will walk through the setup step by step. I will keep everything sanitized so nothing sensitive is disclosed.
What This Setup Does
The basic idea is simple:
- A
cloudflaredconnector runs inside the home or private network. - That connector establishes an outbound-only connection to Cloudflare.
- In Cloudflare Zero Trust, we define one or more private network CIDRs such as
192.168.50.0/24or10.0.10.0/24. - Devices using the Cloudflare WARP client join the Zero Trust organization.
- With split tunnel rules, only selected traffic goes through WARP.
- When we are away from home, we can reach internal services through Cloudflare’s private routing layer.
That means:
- No inbound port forwarding is required for the private services
- We can keep internal IP space private
- We control which routes go through the tunnel
- We avoid forcing all laptop or phone traffic across the home network
Why This Is Better Than “VPN Everything”
A lot of people start with a full-tunnel VPN. That works, but it is often more than we need.
For remote access on the go, the better question is:
“Which traffic actually needs to reach the private network?”
Usually the answer is only a subset:
- Internal dashboards
- NAS or file services
- Private admin panels
- Home automation services
- SSH or RDP targets on private IP ranges
That is where private CIDR routes and split tunnels help. Instead of routing all traffic through the tunnel, we route only the private destinations that matter.
High-Level Architecture
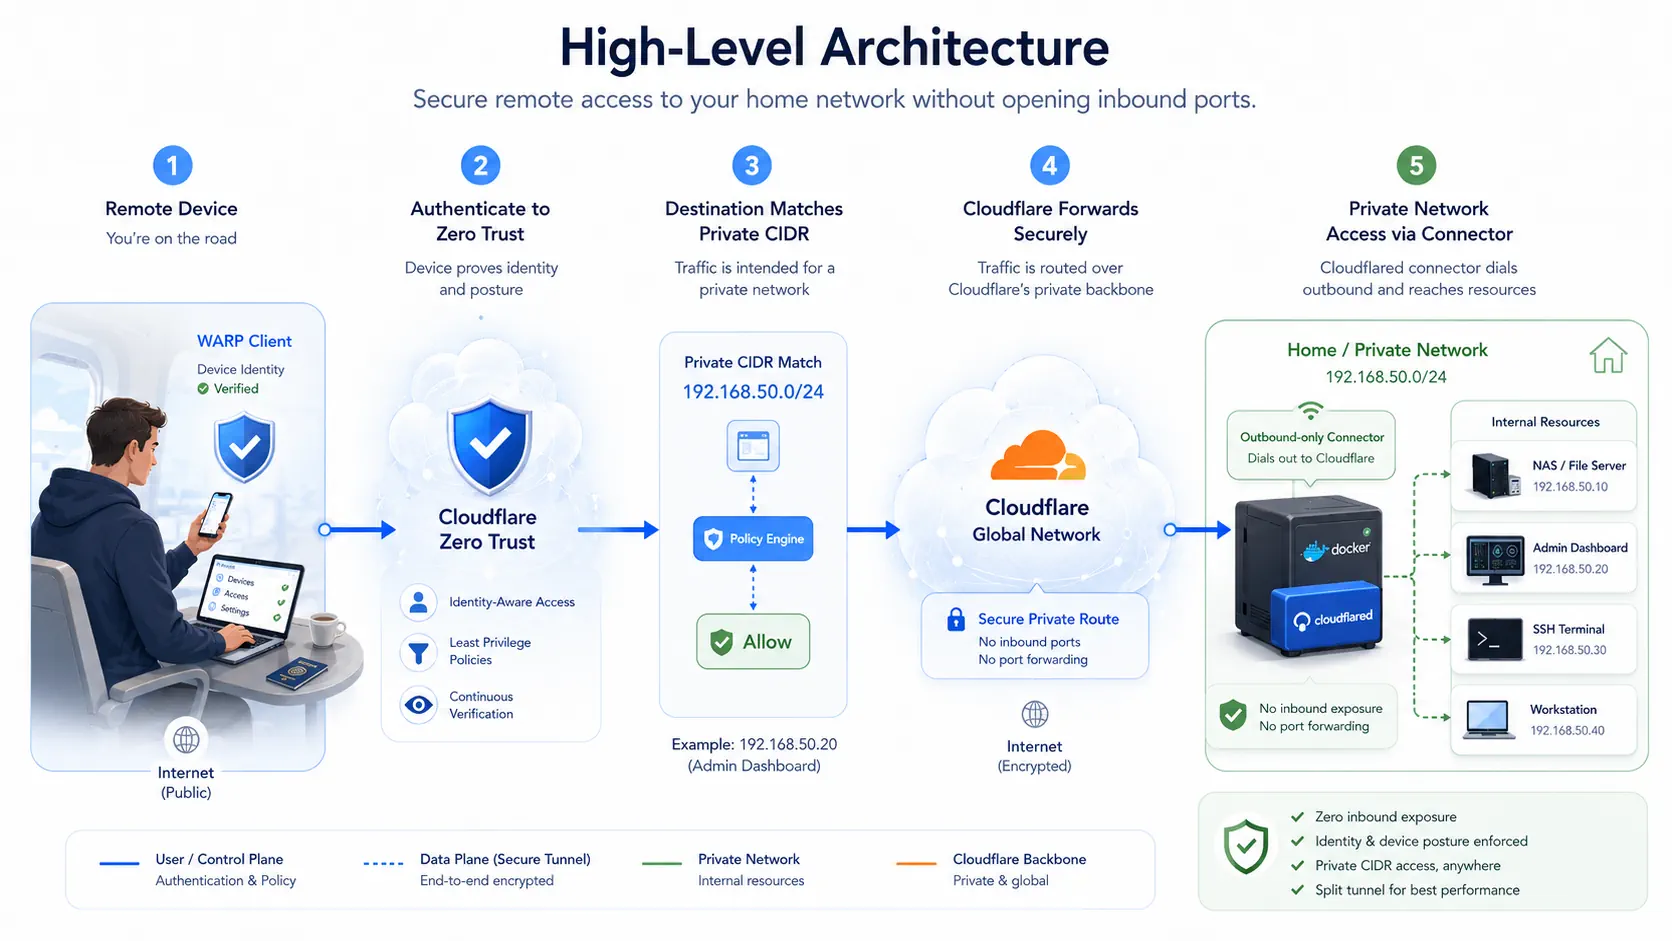
Here is the flow:
- The remote user opens a laptop or phone running the WARP client.
- The device authenticates to the Cloudflare Zero Trust team.
- WARP sees that a destination matches a private route such as
192.168.50.0/24. - That traffic is sent through Cloudflare.
- Cloudflare forwards it through the
cloudflaredconnector running in Docker inside the home or remote network. - The connector reaches the internal destination from inside the network.
This is the key design decision: the connector dials out to Cloudflare, rather than us opening inbound access into the network.
What You Need Before You Start
Before building this, have the following ready:
- A Cloudflare account
- A Cloudflare Zero Trust setup for your team
- A home server, mini PC, NAS, or VPS inside the network that can run Docker
- Docker and Docker Compose installed
- The private subnet or subnets you want to access
- The Cloudflare WARP client installed on the devices you use while traveling
It also helps to know the exact internal CIDR ranges you want to route.
Examples:
192.168.1.0/24192.168.50.0/2410.0.0.0/2410.10.20.0/24
Do not guess here. Be precise.
Step 1: Identify the Private CIDR You Want to Reach
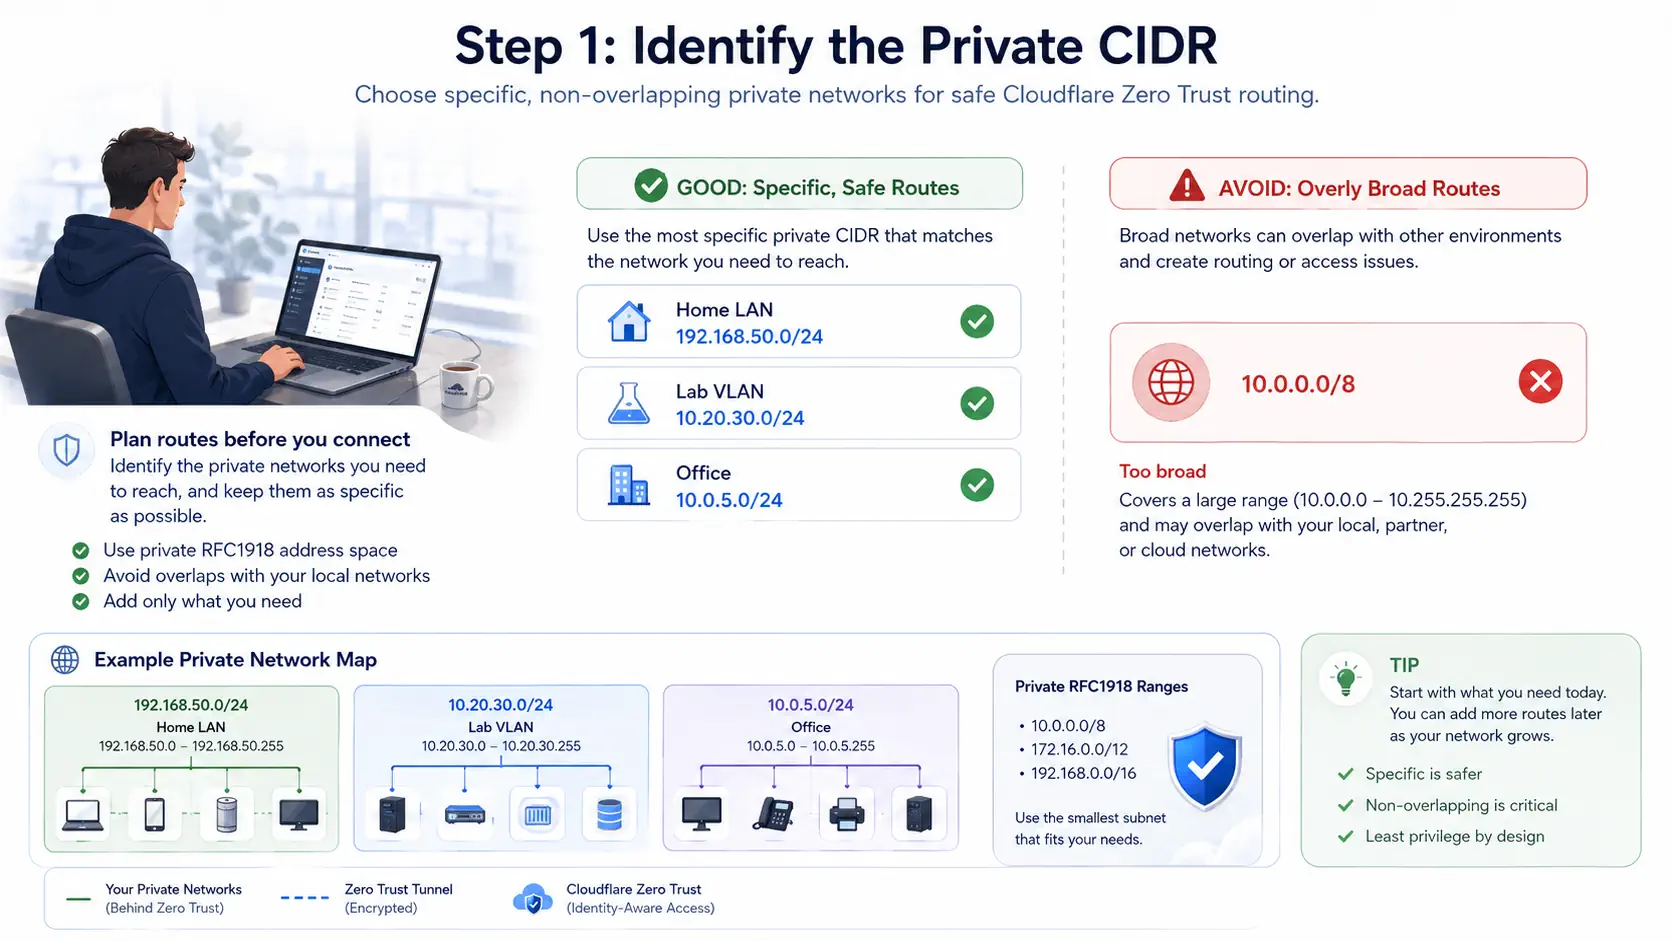
Start by defining the private network ranges that should be reachable remotely.
Examples:
- Home LAN:
192.168.50.0/24 - Lab VLAN:
10.20.30.0/24 - Office subnet:
10.0.5.0/24
Keep the list tight. Do not add giant ranges “just in case.”
Bad example:
10.0.0.0/8
Better example:
10.0.5.0/2410.0.6.0/24
Smaller, explicit routes are easier to reason about and safer to manage.
Step 2: Create a Cloudflare Tunnel Connector
Inside Cloudflare Zero Trust, create a new tunnel for private network access.
You will typically:
- Go to the Zero Trust dashboard.
- Create a new tunnel.
- Choose cloudflared as the connector type.
- Name the tunnel something neutral and descriptive.
- Copy the connector token or credentials Cloudflare provides.
Do not publish:
- Your tunnel token
- Your account identifiers
- Your team name
- Any screenshots containing real route names or internal hostnames
Step 3: Run cloudflared in Docker
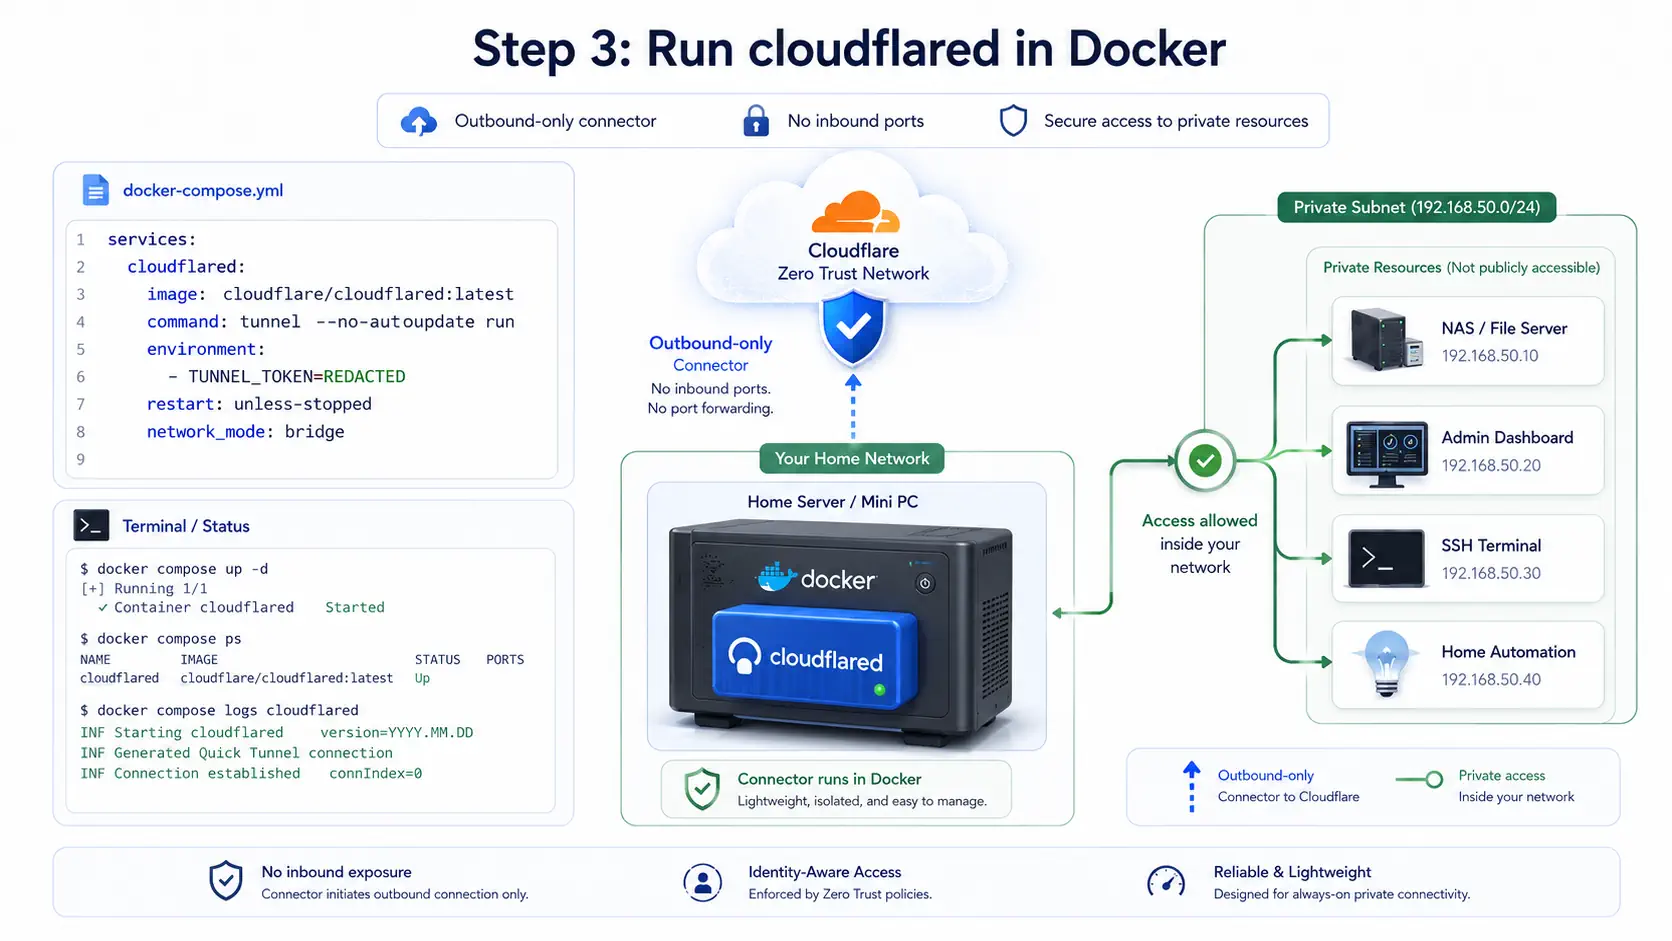
This is the Dockerized proxy part of the setup.
The connector runs on a machine that already has network access to the private services you want to reach. That might be:
- A small Linux box on your home LAN
- A Docker host in your remote environment
- A homelab server attached to the correct VLAN
Here is a clean Compose example:
services:
  cloudflared:
    image: cloudflare/cloudflared:latest
    container_name: cloudflared-private
    restart: unless-stopped
    command: tunnel --no-autoupdate run
    environment:
      - TUNNEL_TOKEN=REPLACE_WITH_YOUR_TUNNEL_TOKEN
Save that as docker-compose.yml.
Then start it:
docker compose up -d
Check that it is healthy:
docker compose ps
docker compose logs cloudflared
Why this works well
- The connector is containerized and easy to redeploy
- It does not require opening inbound ports to private services
- It survives reboots with a restart policy
- It is easy to move to another Docker host later
Step 4: Make Sure the Container Can Reach the Private Network
This is where many setups fail.
The cloudflared container must be able to reach the internal IPs directly from where it runs.
Examples:
- If the target service is
192.168.50.20, the Docker host and container need a route to192.168.50.20 - If the target service lives on another VLAN, the Docker host must already be able to reach that VLAN
If your Docker host cannot reach the subnet, Cloudflare cannot magically fix that.
Before doing anything else, confirm the host running cloudflared can already reach the internal resources locally.
Step 5: Add the Private Network Route in Cloudflare
Now define the private route in Cloudflare Zero Trust.
This tells Cloudflare:
- which CIDR belongs to your network
- which tunnel should handle traffic for that CIDR
Examples of private routes:
192.168.50.0/2410.20.30.0/24
Each route should point to the connector that lives closest to that network.
This is the feature people often refer to as Cloudflare private CIDR routing.
Once the route exists, Cloudflare knows where to send matching traffic.
Step 6: Configure Split Tunnels in WARP
This is the other major piece.
Without split tunnels, you risk routing too much traffic or the wrong traffic through WARP.
With split tunnels, you choose exactly what goes through the tunnel and what stays local.
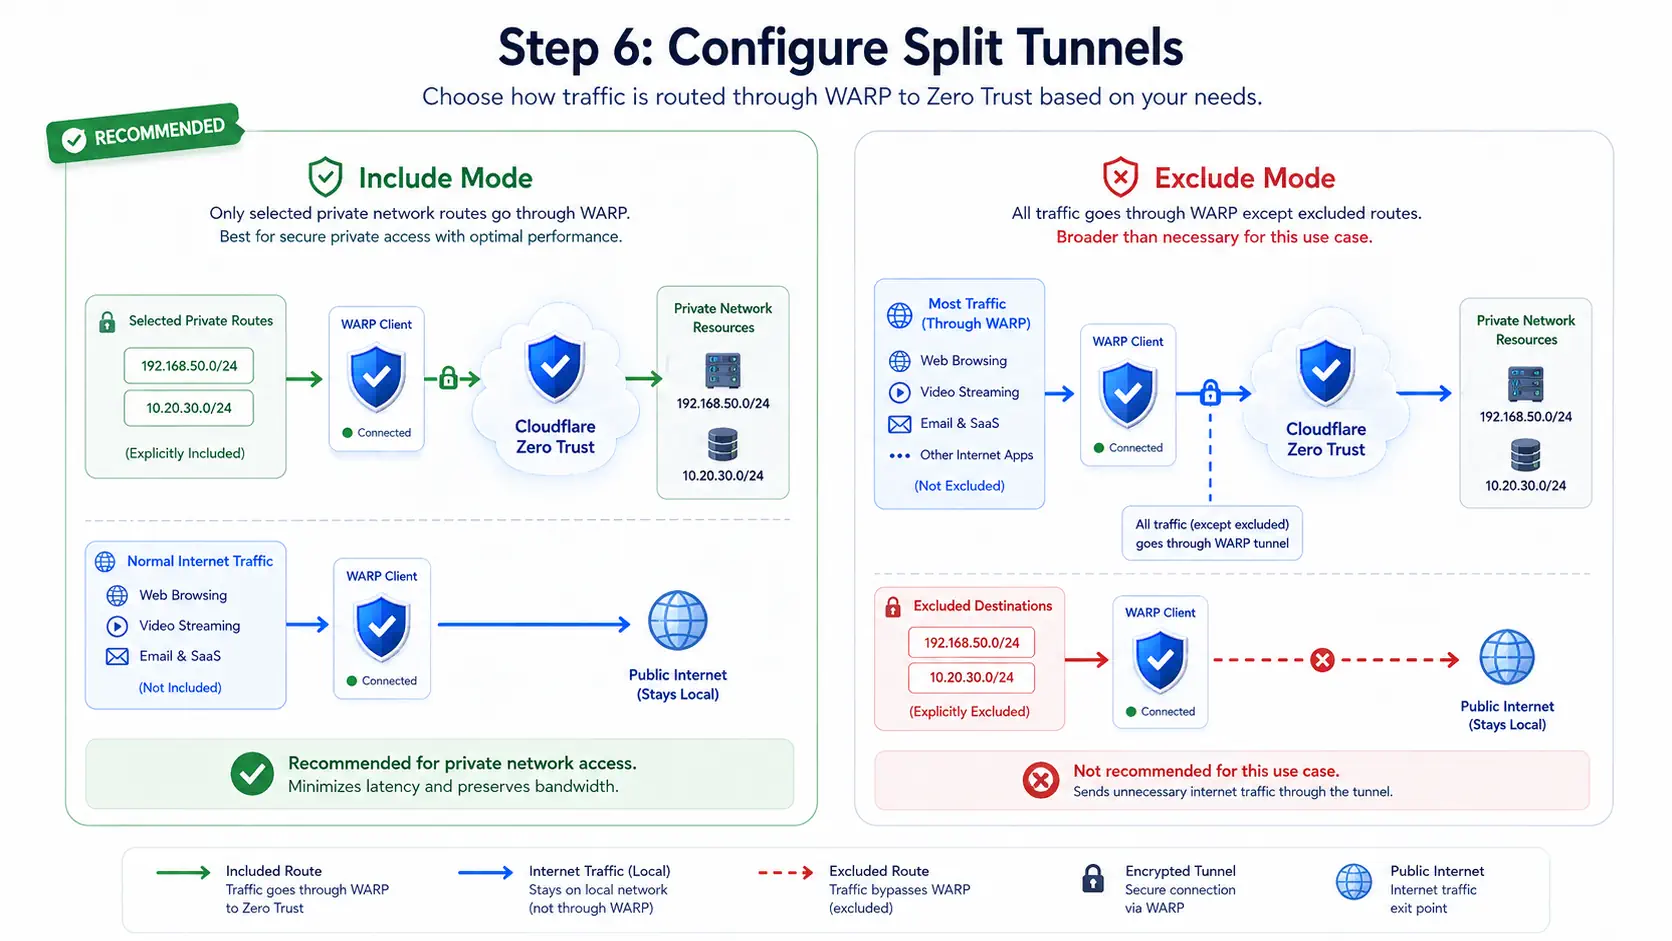
There are two common strategies:
Option A: Include Mode
Only the traffic that matches specific destinations goes through WARP.
This is often the cleanest choice for private network access because it is explicit.
Examples:
- Include
192.168.50.0/24 - Include
10.20.30.0/24
Everything else uses the user’s normal local internet connection.
Option B: Exclude Mode
Everything goes through WARP except the ranges or destinations you exclude.
This is usually less ideal if your only goal is private network access, because it is broader than necessary.
For most home or remote private network use cases, include mode is the simpler and safer design.
Step 7: Attach the Split Tunnel Policy to Devices
In Zero Trust, apply the device profile that contains:
- the WARP enrollment settings
- the split tunnel rules
- any posture or identity requirements you want to enforce
This is how your phone or laptop learns:
- which traffic should use WARP
- which traffic should stay local
If a route is defined in Cloudflare but the client device profile does not send matching traffic into WARP, remote access will not work consistently.
That alignment matters:
- Private route exists in Cloudflare
- Split tunnel includes that route on the client
cloudflaredcan reach the actual destination
All three must be true.
Step 8: Install and Enroll the WARP Client
Install the Cloudflare WARP client on:
- Laptop
- Phone
- Tablet
Then enroll the device into your Zero Trust team.
After enrollment, verify:
- the device is connected
- the correct profile is applied
- the split tunnel rules are present
At this point, when you are away from home and try to reach a private IP inside the included CIDR, that traffic should route through Cloudflare to your Dockerized connector.
Step 9: Test the Setup the Right Way
Do not test from inside the same LAN and assume it works remotely.
Test from a truly external network:
- Disconnect from home Wi-Fi.
- Use mobile data or another outside connection.
- Turn on WARP.
- Try reaching a private resource in the routed CIDR.
Good test targets:
- An internal web UI on a private IP
- SSH to a private host
- RDP to a workstation
- A dashboard bound to the internal subnet
If it fails, check these three layers in order:
- Is the WARP client connected and using the right profile?
- Does the split tunnel policy include the correct CIDR?
- Can the
cloudflaredhost actually reach the target internal IP?
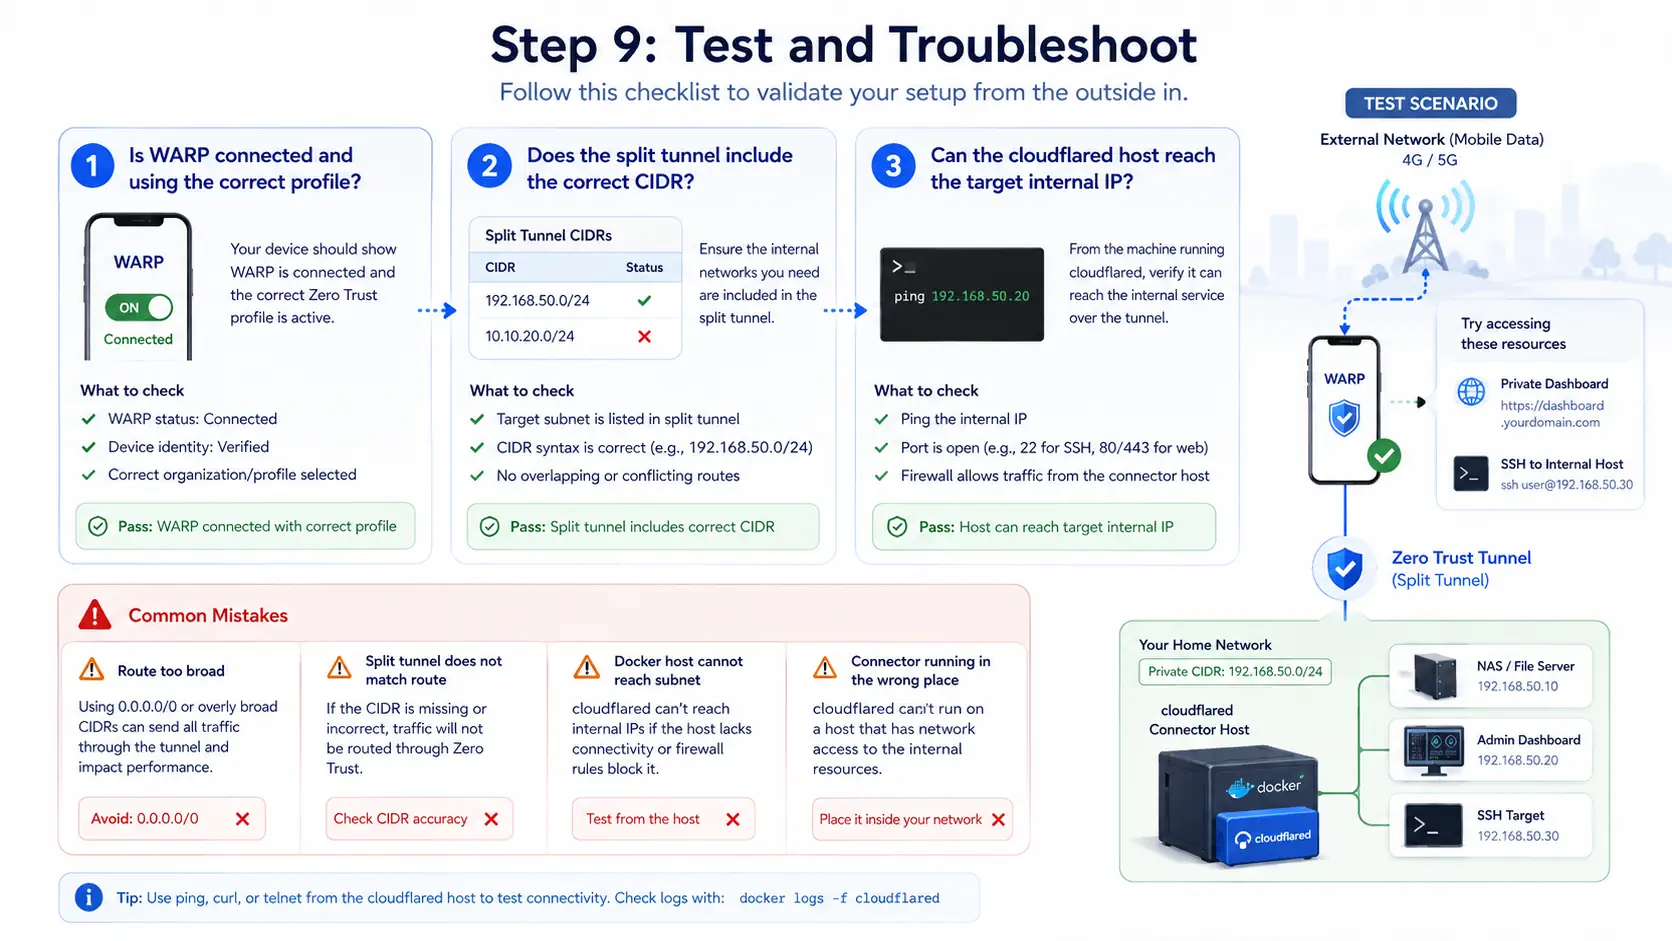
Most problems are in one of those three areas.
Step 10: Beware;
Never disclose:
- Real private IP maps tied to your environment
- Tunnel tokens
- Team domains
- Internal DNS names
- Device identities
- Hostnames that reveal private structure
Step 11: Common Design Mistakes
These are the mistakes I see most often with this type of setup.
1. The route is too broad
People add 10.0.0.0/8 when they only need one subnet.
That creates confusion and can overlap with networks users already have locally.
2. Split tunnel rules do not match the route
A private route in Cloudflare is useless if the WARP client never sends that CIDR into the tunnel.
3. The Docker host cannot reach the target subnet
The connector is not a magic bridge. It still depends on the underlying network path.
4. The connector is running in the wrong place
If the container sits on a host that is not attached to the right network, private services will remain unreachable.
5. Everything is documented with live values
Never use production tokens or real internal hostnames in tutorials, screenshots, or exported QR codes.
Step 12: Why This Setup Is Practical for Travel
This pattern works well when you are on the go because:
- It does not require opening inbound firewall ports to the private network
- You can keep routing narrow and intentional
- The WARP client handles device-side connectivity cleanly
- The Dockerized
cloudflaredconnector is easy to maintain - You can reach private services without turning your whole network into a public target
For a lot of homelab and remote admin use cases, this is a better fit than a blunt always-on full-tunnel VPN.
Final Thoughts
If your goal is secure access to a home or remote private network while traveling, Cloudflare Zero Trust gives you a very clean architecture:
- Private CIDR routes define what internal network space should be reachable
- Split tunnels define what client traffic should use WARP
- A Dockerized
cloudflaredconnector gives Cloudflare a safe outbound path into your network
The key is to stay disciplined:
- Keep CIDRs specific
- Keep split tunnel rules aligned with those CIDRs
- Run the connector on a host that can already reach the private network
- Never publish real tokens, team names, or internal topology in your public write-up
That combination gives you reliable remote access without unnecessarily exposing your network or forcing all traffic through a traditional VPN design.
