
This library can be used to control ESP8266 nodes from Node-Red. Just burn Examples/ESPMetRED/ESPMetRED.ino to your ESP8266 using Arduino IDE and you are ready to go.
Contents:
Features:
- Arduino IDE compatible
- Works with all ESP8266 SOICs such as ESP-12E, ESP-12F and boards such as NodeMCU, WeMos D1 Mini etc.
- Back and forth communication between ESP8266 and Node-Red using MQTT protocol
- Auto connect to WiFi or MQTT server in case of failure
- Support Static IP address configurations
- Deep sleep support (no connection problem on waking up, connects within 2 seconds)
- Timer for Timely operations, update Sunrise or Sunset data and preserve it in flash memory
- Save variables in Flash memory
- Retrieve variables from Flash memory on booting ESP8266
- Preserve and restore GPIO state i.e. HIGH or LOW
- Over the Air (OTA) update
- More are coming soon!!
Downloads:
- ESPMetRED Github Repository
- Change Log
- Dependencies
- ArduinoJson library
- PubSubClient library
- All other libraries (with #include statement in example sketches) are builtin (inside Arduino Core for ESP8266)
Client API:
Save a variable to Flash memory:
- Instance of ESPMetRED Library
ESPMetRED client;
- Save a variable in Flash memory
boolean var = client.WriteSPIFFS(Object, Value);
- Where
- Object: A String type of data
- Value: Supports “int”, “long” data types
- Return: true or false
Retrieve a variable value from Flash memory:
- Instance of ESPMetRED Library
ESPMetRED client;
- Get a variable value out of Flash memory
int var = client.ReadSPIFFS(Object);
- Where
- Object: A String type of data
- Return: “int” or “long” type of data
Switch a pin to LOW or HIGH:
- Instance of ESPMetRED Library
ESPMetRED client;
- Switch a pin to HIGH
boolean gpio = WriteGPIO(Pin, Value);
- Where
- Pin: An “int” data type
- Value: An “int” data type (0 or 1)
- Return: true or false
- New state of a pin will be automatically saved in flash memory
- To retrieve state of a pin
int state = client.ReadSPIFFS("12");
- Where
- 12 is pin number in “String” data type
Note:
- Don’t forget to set the pin as output
Fetch Time, Sunrise and Sunset:
- Instance of ESPMetRED Library
ESPMetRED client;
- Retrieve system time
unsigned long system_time = client.Time();
- Save time to Flash memory
unsigned long system_time = client.Time();
client.WriteSPIFFS("Time", system_time);
- Where
- Time: JSON property used for recording time in Flash memory
- Retrieve sunrise
unsigned long sunrise_time = client.Sunrise();
- Retrieve sunset
unsigned long sunset_time = client.Sunset();
Note:
- Retrieved time is in milliseconds
- Applicable for “system time”, “sunrise” and “sunset”
Publish data to server:
- Instance of ESPMetRED Library
ESPMetRED client;
- Send data to MQTT_PUBLISH_TOPIC
client.Publish(Payload);
- Where
- Payload: String data type
- Sending JSON data to MQTT_PUBLISH_TOPIC
String jObject = JsonString(Topic, Payload);
client.Publish(jObject);
- Where
- Topic: String data type
- Payload: String data type
- JsonString(Topic, Payload) function will return a String data into the JSON format i.e. “Topic”:”Payload”
- Send data to a specific topic
client.Publish(MQTT_Topic, Payload);
- Where
- MQTT_Topic: const char data type
- Payload: String data type
- Sending JSON data to a specific topic
String jObject = JsonString(Topic, Payload);
client.Publish(MQTT_Topic, jObject);
- Where
- Topic: String data type
- Payload: String data type
- MQTT_Topic: const char data type
- JsonString(Topic, Payload) function will return a String data into the JSON format i.e. “Topic”:”Payload”
Custom callback function in Arduino IDE sketch for MQTT message received:
If you want to get data received from MQTT subscribed topic right in your sketch, follow me;
- Instance of ESPMetRED Library
ESPMetRED client;
- Add callback in void setup() function
client.setCallback(callback);
- Add callback function at the end after or before void loop() function
void callback(String Payload)
{
  // Perform your desired functions on payload received;
}
Note:
- Payload received is String data type and is not processed in JSON object
- Used the following commands to convert Payload into JSON object
char jsonChar[100];
Payload.toCharArray(jsonChar, Payload.length()+1);
StaticJsonBuffer<500> jsonBuffer;
JsonObject& jObject = jsonBuffer.parseObject(jsonChar);
- Suppose Payload contains the following information
{"TOPIC":"MyTopic", "PAYLOAD":"1"}
- To get data out of “TOPIC” and “PAYLOAD” i.e. “MyTopic” and “1”, respectively, use the following commands
String topic = jObject["TOPIC"];
int value = jObject["PAYLOAD"];
Static IP Address:
- To assign static IP address, add three variables to your sketch
IPAddress ip(192, 168, 50, XX);
IPAddress gateway(192, 168, 50, 1); //Your router IP address
IPAddress subnet(255, 255, 255, 0); //Your router subnet mask
IPAddress dns(192, 168, 50, 1); //Your router IP address
- Change XX with your desired IP address e.g. 192, 168, 50, 100
- Rest of the values should resembles your WiFi network
- Now instantiate ESPMetRED Library
ESPMetRED client(ip, gateway, subnet, dns);
Server API:
Pulling Node System Information:
- Add “INJECT” node in Node-Red
- Choose “{} JSON” option in “Payload”
- Add the following code in “Payload” field
{"TOPIC":"SYSTEM", "PAYLOAD":"INFO"}
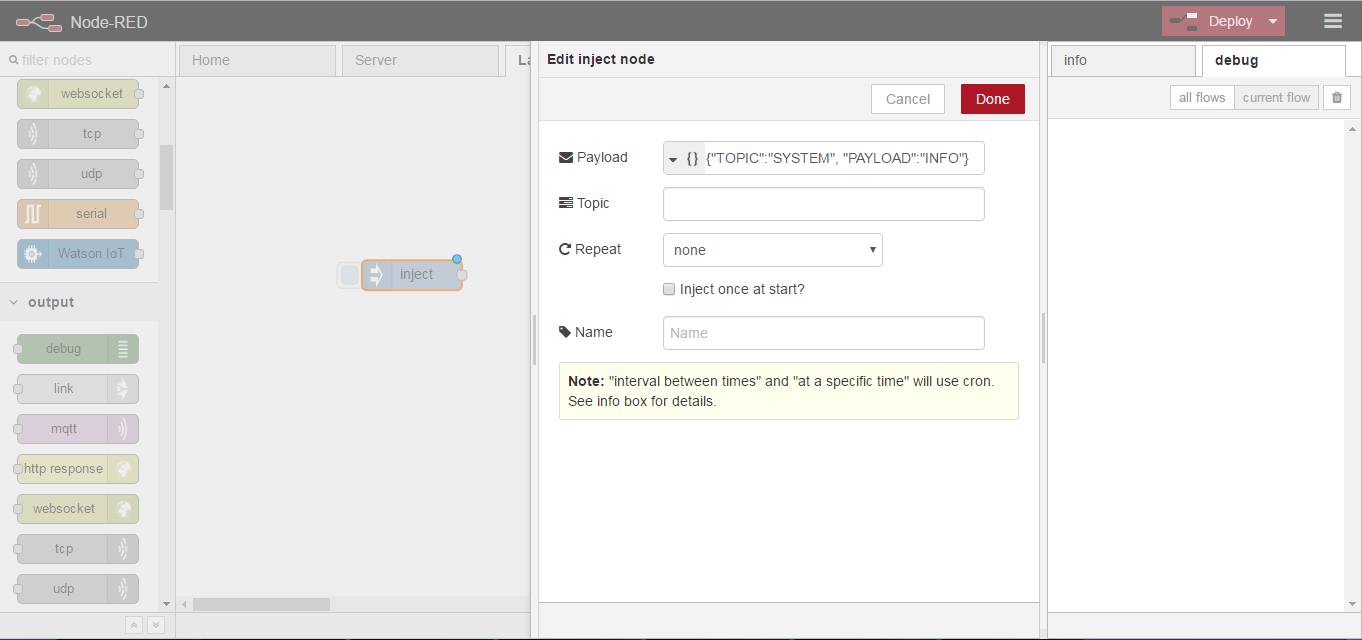
- Hit done
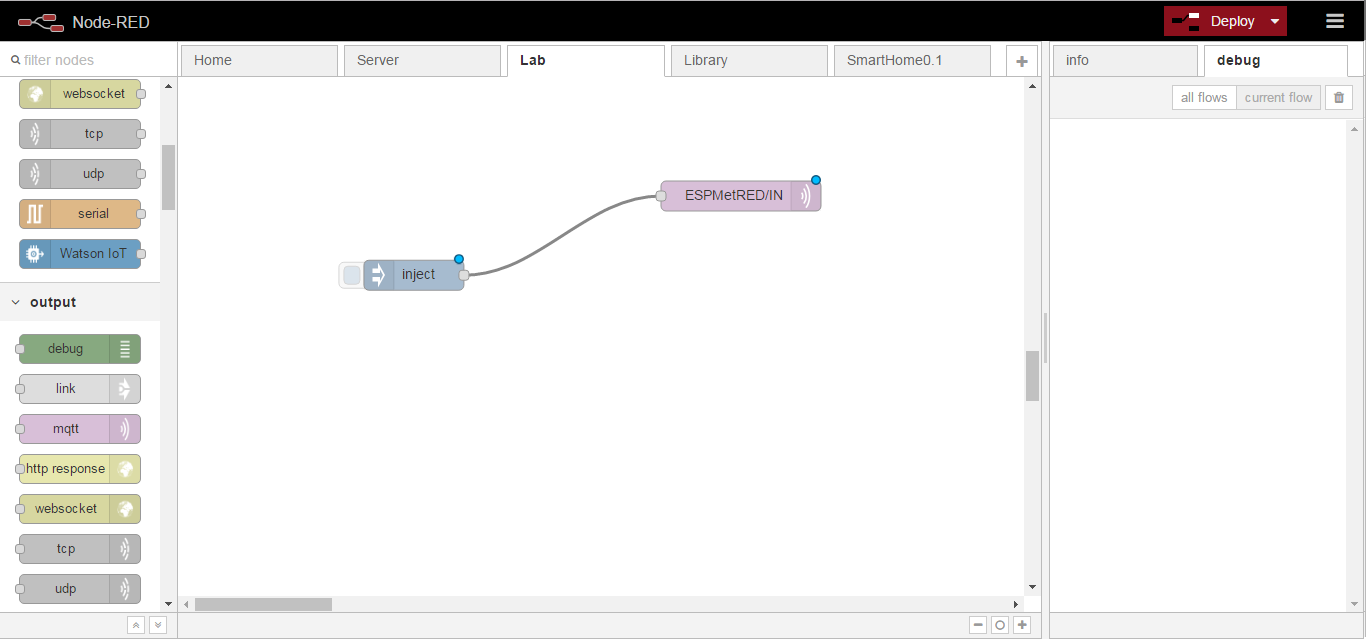
- Add “mqtt out” node in Node-Red
- Add server settings according to this post
- In “Topic” field add your subscribed topic (Arduino sketch) e.g. ESPMetRED/IN

- Hit done
- Join both nodes and click on “Deploy”
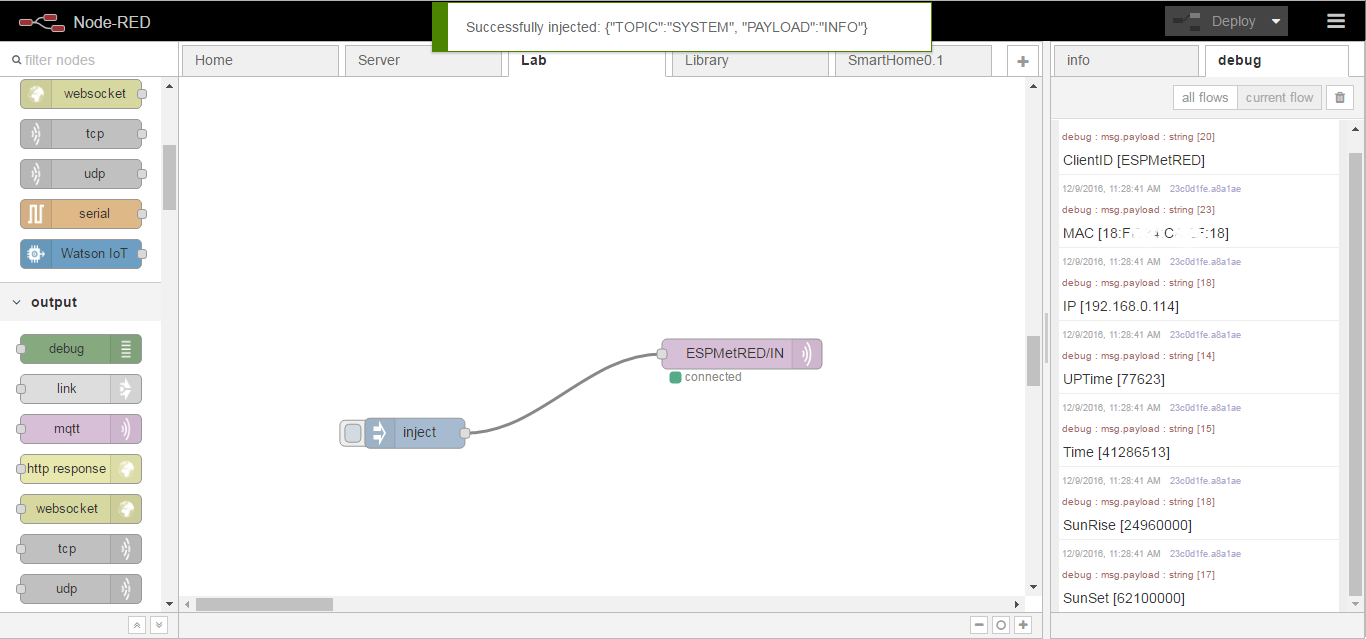
- Now hit Inject node button and you will get node system information
- Don’t forget to add “mqtt in” node with “debug” topic attached with debug node as all kind of system information will go on “debug” topic.
Push Time data to ESP8266 units:
- Create a “MQTT in” node and enter ntp/IN in Topic field
- Add json node and link it to “MQTT in” node
- Add a “function” node and add following code in to it
var destination = msg.payload.topic;
var d = new Date();
var hours= d.getHours();
var minutes = d.getMinutes();
var NTP = (hours*60*60*1000) + (minutes*60*1000);

var sunrise = context.global.ntp.sunrisems;
var sunset = context.global.ntp.sunsetms;

msg.topic = destination;
msg.payload = {"TOPIC":"SYSTEM", "PAYLOAD":"NTP", "NTP":NTP, "SUNRISE":sunrise, "SUNSET":sunset};

return msg;
- Name the “function” node as “Time Push”
- Add “MQTT out” node and leave it as it is
- Link all of these nodes as shown below and hit “Deploy”

All of the code works fine but and context.global.ntp.sunsetms (global variables in Node-Red to store sunrise and sunset data) needs to be configured. There are variety of ways to get sunrise and sunset data for example, using http request node to fetch data from www.wunderground.com.

It requires getting your own api key from https://www.wunderground.com/weather/api by registering yourself there. In http request node, send the following URL using get as method.
http://api.wunderground.com/api/your_api_key/astronomy/q/latitude,longitude.json
- Don’t forget to change “your_api_key“, “latitude” and “longitude” according to your own information.
- Change Return to “a parsed JSON object“
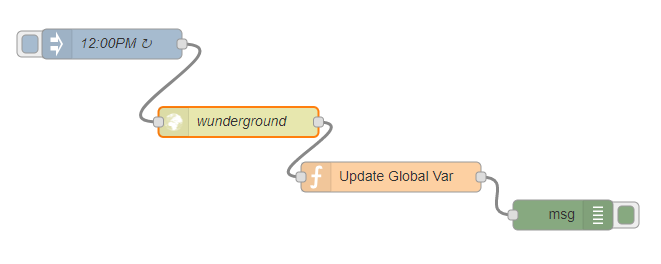
Grab another “function” node and add follow code to it.
var ids = "ntp"; // Name of Node
var idx = ["sunrise", "sunrisems", "sunset", "sunsetms"]; //Topic on which value needs to be posted
var itm = ["sunrisev", "sunrisemsv", "sunsetv", "sensetmsv"]; //Values

itm[0] = ("0" + msg.payload.sun_phase.sunrise.hour).slice(-2) + ':' + ("0" + msg.payload.sun_phase.sunrise.minute).slice(-2);
itm[1] = ((msg.payload.sun_phase.sunrise.hour)*60*60*1000) + ((msg.payload.sun_phase.sunrise.minute)*60*1000);
itm[2] = ("0" + msg.payload.sun_phase.sunset.hour).slice(-2) + ':' + ("0" + msg.payload.sun_phase.sunset.minute).slice(-2);
itm[3] = ((msg.payload.sun_phase.sunset.hour)*60*60*1000) + ((msg.payload.sun_phase.sunset.minute)*60*1000);


for (i=0; i<4; i++)
{
    postValue(ids, idx[i], itm[i]);
}


function fetchValue(node, property) //Fetch value from database
{
    if(context.global.database === undefined)
    {
        return "Database [Error]";
    }
    else
    {
        var database = context.global.database;
        if(database[node] === undefined)
        {
            return "".concat(node, " [Error]");
        }
        else
        {
            var entity = database[node];
            return entity[property];
        }
    }
}

function postValue(node, property, value)
{
    if(context.global.database === undefined)
    {
        context.global.database = {node:{property:value}};
        return true;
    }
    else
    {
        var database = context.global.database;
        if(database[node] === undefined)
        {
            database[node] = {property:value};
            context.global.database = database;
            return true;
        }
        else
        {
            var entity = database[node];
            entity[property] = value;
            database[node] = entity;
            context.global.database = database;
            return true;
        }
    }
}

return {Sunrise:itm[0], SunriseMs:itm[1], Sunset:itm[2], SunsetMs:itm[3]};
Now it will save sunrise and sunset to global and context.global.ntp.sunset variables. A “debug” node will show debug information when it will save data to these variables, however, it is not mandatory.
Note:
- Sunrise or sunset values will be written to global variables daily at Noon i.e. 12:00 PM
Now every time an ESP8266 unit will boot up, It will get time data automatically. Moreover, to update sunrise and sunset data which changes by days, to ESP8266 units, We should do a little more work.
- Add an “inject” node and select “interval” in “Repeat”
- Add your desired time interval such as “12” and “hours” and hit done
- Copy the “function” node as created above with the name of “Time Push” by Ctrl + C keys and paste it using Ctrl + V keys
- Add “MQTT out” node and add ntp/OUT in Topic field, hit done
- Join all of three nodes as follows and “Deploy” changes

Now “Time”, “Sunrise” and “Sunset” data will be updated to all ESP8266 units every 12 hours automatically.
Drive a gpio right from Node-Red:
- Publish the following code on MQTT_SUBSCRIBE_TOPIC in the same way you do in Pulling Node System Information
{"TOPIC":"GPIO", "PIN":"12", "VALUE":"0"}
- Change
- “12”: Your desired gpio
- “0”: Desired state either “0” or “1”
Hi, can you tell me why you use JSON formatting to transmit data by MQTT between the ESP and the Node-Red application. As a beginner I would have though simple strings would be easier to use.
However, a really great library and blog from which I have learnt a great deal.
Thank you
Hi Bob, You can use simple String with this library by sending whatever information on your subscribed topic. Have a look on ESPMetRED/Examples/CallBack/CallBack.ino However all that information will go directly to your own sketch and you’ll have to define all your required functions. As far as your question about JSON is concerned, It is very easy to get required information from a JSON data especially when there are number of sensor nodes exchanging a lot of information to each other. Let’s suppose, you just want to pull a gpio HIGH and you send a command from Node-Red to the sensor… Read more »
I am getting several error when try to compile the example. this is the log: Arduino:1.8.1 (Windows 10), Tarjeta:"NodeMCU 1.0 (ESP-12E Module), 80 MHz, 115200, 4M (3M SPIFFS)" C:\Users\xinux\Documents\Arduino\libraries\ESPMetRED-master\ESPMetRED.cpp:35:6: error: prototype for 'void ESPMetRED::joinWiFi()' does not match any in class 'ESPMetRED' void ESPMetRED::joinWiFi() In file included from C:\Users\xinux\Documents\Arduino\libraries\ESPMetRED-master\ESPMetRED.cpp:8:0: C:\Users\xinux\Documents\Arduino\libraries\ESPMetRED-master/ESPMetRED.h:57:10: error: candidate is: boolean ESPMetRED::joinWiFi() boolean joinWiFi(); C:\Users\xinux\Documents\Arduino\libraries\ESPMetRED-master\ESPMetRED.cpp:65:6: error: prototype for 'void ESPMetRED::joinMqTT()' does not match any in class 'ESPMetRED' void ESPMetRED::joinMqTT() In file included from C:\Users\xinux\Documents\Arduino\libraries\ESPMetRED-master\ESPMetRED.cpp:8:0: C:\Users\xinux\Documents\Arduino\libraries\ESPMetRED-master/ESPMetRED.h:59:10: error: candidate is: boolean ESPMetRED::joinMqTT() boolean joinMqTT(); C:\Users\xinux\Documents\Arduino\libraries\ESPMetRED-master\ESPMetRED.cpp:81:6: error: prototype for 'void ESPMetRED::keepalive()' does not match any in class 'ESPMetRED' void ESPMetRED::keepalive() ^… Read more »
We have modified the code lately. Find new version of ESPMetRED on our GitHub repository https://github.com/HobbytronicsPK/ESPMetRED.
It works like a charm! I was playing with all the examples. Could you please add some example on how to implement OTA updates in node-red/esp sketch? I was trying but I was rounding in a loop of errors 🙂 Thanks in advance fron the other side of the wolrd!
What I was trying so far: Using bigtimer to set upgrades at night when ESP are doing nothing , OTA update sketch example fron lmroy pubsubclient with some (not well done, I guess) modifications . My idea is to everytime I have an update spread it to several ESP`s at home overnight and getting a report using node-red-dashboard to know status (updated/on queue/error) to let me know how was done on the morning. (by now nice ideas and bad code 🙂 )
OTA update has already implemented and works just sending “OTA” command as “PAYLOAD” on to “SYSTEM” “TOPIC” in Json format i.e. {“TOPIC”:”SYSTEM”, “PAYLOAD”:”OTA”}. Currently OTA works with local web server such as nginx at Port 82 (Normally server port is 80 which We are using for some other purpose and currently using Port 82 for OTA) which means you have to upload binary file to your server and send command to your sensor node afterwards. Sensor node will check for new binary file if it detects new file, it will proceed otherwise cancels OTA. Establishing nginx server needs another tutorial,… Read more »
I guess that should have a review cause that is ok if you have one o more of the same type node, but in you have more that one iot device to update, for example one relay controller and 2 temperature sensors (3 ESP8266 for example) the code don´t know what is the correct bin file. I will try to think about it (with my humble tiny knowledge of course, if you don´t mind of course)
I’ll try my best to write down a tutorial as soon as possible on “How to build up a web server for OTA update for ESP8266” and “Where to find the binary file”. After that you’ll be able to accomplish this task with out any issue.
Hi
First a HUGE thank you for your work – this is my very first Arduino project and your code is working GREAT & I have my NodeMCU & RaspberryPi happily talking to each other over MQTT 🙂
Can I ask one request please – When my NodeMCU connects I would really like that a message is sent to Node-RED to say it has connected – I’ve tried adding the below line to end end of my void setup code, but nothing is sent 🙁
client.Publish(MQTT_PUBLISH_TOPIC,”NodeMCUconnected”);
Any help much appreciated!
Thanks
James
Hello James. May you please share your sketch so that I see why does it not publish message at your specific topic?
HI Waqas
Many thanks for agreeing to take a look 🙂
Very clumsy code below as Im a real beginner… but everything works apart from the ESP does not ‘announce’ itself when connected 🙁
However, I can happily send commands from NodeRed and they are received and work fine!(the bit that does not work is the bit below & above the “+++++++” comment
I suppose it may be a problem on NodeRed side..
Here’s the code : https://pastebin.com/BdPBEiED
Thanks!!
James
I have reviewed your code. There were a lot of mistakes you made. Such as you initialized serial library (Serial.begin(115200)) lot of times. If you use ESPMetRED, you don’t need to initialize it. Library also handles WiFi and MQTT communication by it’s own along with OTA updates. There is no need to include all those stuff (such as WiFi.begin(ssid, password); ArduinoOTA etc. etc.). When you use client. Publish(“topic”, “payload”) function, it publishes data on to your specified topic. If you want to publish something over “const char* MQTT_PUBLISH_TOPIC” already defined by you, just use “Publish(“payload”)” function.I have tried to make… Read more »
Hi Waqas
So sorry for such a slow response! I have been away for a week & only now get back to my computer..
Thank you SO much for spending some time on this, it is REALLY appreciated!! I did not have time to test it yet, but I’m really looking forward to trying it out.
Thank you again!
James
I’m a beginner to IoT and found your library to be very useful and isolate me from some complexities. Thank you for your contribution.
I think I detected an error in file ESPMetRED/Examples/CallBack/CallBack.ino
In line 21 program calls “client.setCallback(callback);”, and it should be “client.setcallback(callback);” (no uppercase c)
This was driving me crazy with a compilation error!
Thanks again.
Always download latest release by clicking download link under Available versions: on to our github repository.
Can I use this library with Sonoff / Slampher?
Yes. It can be used with any ESP8266 or ESP8285 based product. However, OTA functionality will not work on MCUs with 1M Flash e.g. ESP8285 or 1M ESP8266 ESP-01.
Do you have any OTA example using this library ? I am wondering how to send a binary file from node-red IBM cloud to ESP8266 via MQTT.